Few things are more frustrating for a coffee lover than a grinder that hums with life but refuses to deliver the fresh grounds needed for that perfect cup. You hit the button, hear the familiar whir of the motor, but the beans just sit there, untouched. This common issue points to a disconnect between the power source and the grinding mechanism, and fortunately, it’s often a fixable problem.
This guide will walk you through the essential troubleshooting steps, help you pinpoint the exact cause of your grinder’s silent protest, and provide practical solutions to get it back to its bean-pulverizing best. Whether you own a simple blade grinder or a sophisticated burr model, understanding the core components and their potential failure points is the first step towards enjoying freshly ground coffee once again.
Understanding Your Coffee Grinder: Burr vs. Blade
Before diving into fixes, it’s helpful to understand how different grinder types operate, as this will inform where you look for problems.
Blade Grinders: These budget-friendly grinders use a spinning blade, similar to a propeller, to chop coffee beans into varying sizes. The blade is typically directly connected to the motor. Problems here usually involve the blade itself being jammed or disconnected.
Burr Grinders: Favored by connoisseurs for their consistent grind, burr grinders crush beans between two abrasive surfaces (burrs). One burr remains stationary, while the other rotates. These come in two main types: conical and flat. Burr grinders have a more complex drive mechanism, often involving gears or a coupling that transfers power from the motor to the rotating burr. This complexity means more potential points of failure, but also more opportunities for repair.
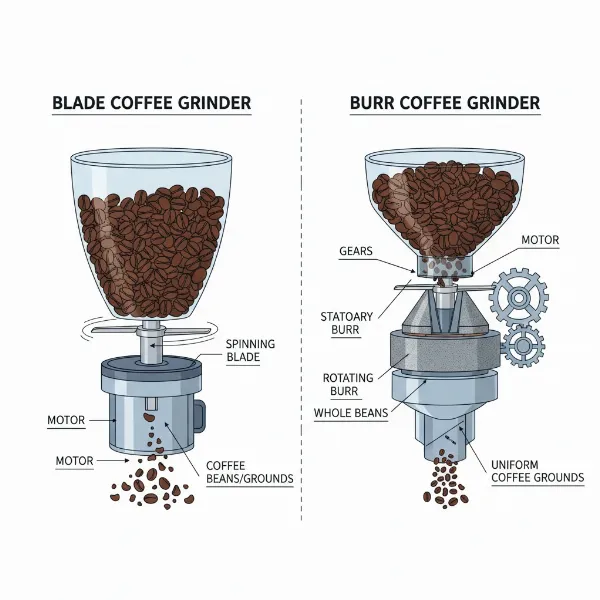 Visual comparison of blade grinder and burr grinder mechanisms for consistent coffee grinding.
Common Reasons Your Grinder Spins But Doesn’t Grind
When your coffee grinder’s motor is working but no grinding is happening, it almost always signals a mechanical failure or obstruction. Here are the most frequent culprits:
1. Clogged Grinding Chamber or Burrs
|
Our Picks for the Best Coffee grinder in 2026
As an Amazon Associate I earn from qualifying purchases.
|
||
| Num | Product | Action |
|---|---|---|
| 1 | Amazon Basics Electric Coffee Grinder, Coffee Bean and Spice Grinder, With Heavy-Duty Stainless Steel Grind Blades |

|
| 2 | Cuisinart Coffee Grinder, One Touch Control Coffee Bean Grinder with Stainless Steel Bowl and Blades, 2.5 oz/70g Capacity Enough for 12 Cups, On/Off Switch with Safety Interlock, DCG-20BKN, Black |
|
| 3 | Hamilton Beach Custom Grind Electric Coffee Grinder for 4-14 Cups, One-Press Hand-Free Operation with Auto Shutoff, Removable Grinding Bowl For Easy Pour and Clean, Stainless Steel (80406) |
|
| 4 | SHARDOR Professional Conical Burr Coffee Grinder, Coffee Bean Grinder with 48 Grind Settings for Espresso, Drip & French Press, Upgraded Anti-Static Technology, Precision Timer, Stainless Steel |
|
| 5 | OXO Brew Conical Burr Coffee Grinder - Silver, Stainless Steel Burrs, One-Touch Automatic Smart Grind |
|
| 6 | Automatic Coffee Machine, 20-Bar Pressure Espresso Maker with Built-in Grinder, 15-Precision Settings, One-Touch Latte & Cappuccino System, Smart Self-Cleaning |
|
| 7 | BLACK+DECKER One Touch Coffee Grinder, 2/3 Cup Coffee Bean Capacity, Spice Grinder, One Touch Push-Button Control -150 Watts -Stainless Steel Blades |
|
| 8 | Cuisinart Coffee Grinder, Electric One-Touch Automatic Burr Coffee Grinder with 18-Position Grind Selector, Cup Size Selector for 4 – 18 Cups, DBM-8P1, Black Stainless |
|
| 9 | Wancle Electric Coffee Grinder, Spice Grinder, One Touch Coffee Mill for Beans, Spices and More, with Clean Brush Black |
|
| 10 | Hamilton Beach Fresh Grind Electric Coffee Grinder for Beans, Spices and More, Stainless Steel Blades, Removable Chamber, Makes up to 12 Cups, Black |
|
One of the most common and easily remedied issues is a blockage. Over time, coffee oils, fine grounds, or even an errant bean fragment can accumulate and jam the burrs or blades. This build-up prevents the grinding elements from rotating properly, even if the motor is spinning.
Symptoms: The motor might sound strained or hum, the burrs may not move at all or only very weakly, and no ground coffee will emerge.
Fix: A thorough cleaning is usually all that’s needed. This involves disassembling the grinding chamber and removing all obstructions.
2. Stripped Drive Coupling or Gears
This is a frequent mechanical failure, especially in burr grinders that use plastic gears or a plastic coupling to transfer rotational force from the motor to the burrs. If these components become worn, stripped, or cracked, the motor will spin freely, but its power won’t reach the grinding mechanism.
Symptoms: The motor spins freely and loudly, often without any resistance from the beans, and you might hear a clicking or whirring sound distinct from normal operation. No grinding occurs.
Fix: This typically requires replacing the damaged drive coupling or gears. Depending on your grinder model, these parts may be available for purchase and relatively straightforward to replace yourself.
3. Worn or Damaged Burrs
While the motor is spinning, the burrs themselves might be the problem. If they are excessively worn, dull, or damaged by foreign objects (like a small stone), they might lack the ability to effectively grab and crush coffee beans.
Symptoms: The grinder runs, perhaps sounds normal, but produces inconsistent results, very coarse grounds, or no grounds at all. You might hear unusual scraping sounds if burrs are damaged.
Fix: The only solution for worn or damaged burrs is replacement. Most quality burr grinders allow for burr replacement, which can significantly extend the life of your machine.
4. Incorrect Assembly After Cleaning
If your grinder stopped working shortly after you cleaned it, the issue might be as simple as improper reassembly. Components like the outer burr or grind adjustment ring may not be seated correctly, preventing the grinding mechanism from engaging with the motor.
Symptoms: Similar to a stripped coupling, the motor spins but the grinding parts don’t move or engage properly. It might feel “loose” when you try to adjust the grind.
Fix: Carefully disassemble and reassemble your grinder, referring to your owner’s manual for specific instructions. Ensure all parts click securely into place.
5. Overload or Overheating Protection
Many electric grinders have built-in safety features to prevent motor damage from overheating or overloading. If you’ve been grinding for an extended period, or if the grinder became severely jammed, the protection circuit might have temporarily shut down the grinding action while allowing the motor to still spin or hum.
Symptoms: The grinder stops mid-grind, but the motor might still be powered or make a sound. There’s usually a complete cessation of grinding.
Fix: Unplug the grinder and let it cool down for at least 20-30 minutes. Clear any visible obstructions. Once cooled, try grinding a small amount of beans. If the problem persists, another underlying mechanical issue is likely.
Step-by-Step Troubleshooting and Fixes
Tackling a non-grinding grinder requires a methodical approach. Always prioritize safety by unplugging the device before inspection or repair.
Step 1: Unplug and Inspect
Safety is paramount. Always unplug your coffee grinder from the power source before performing any inspection or maintenance. Once unplugged, remove the bean hopper and any visible top burr or blade assembly. Use a flashlight to peer into the grinding chamber. Look for obvious obstructions such as whole beans stuck between the burrs, clumps of old grounds, or foreign objects like small stones or debris.
Step 2: Clear Any Obstructions
If you find any blockages, gently remove them. Use a small, stiff brush (often included with grinders), a vacuum cleaner with a narrow attachment, or a toothpick. Avoid using metal objects that could damage the burrs or blades. Never use water or immerse electrical components in liquid. Compressed air can also be effective for dislodging stubborn particles, but be careful not to blow debris further into the motor housing.
Step 3: Check Burr Alignment and Condition (For Burr Grinders)
For burr grinders, carefully remove the upper burr (if removable). Inspect both the upper and lower burrs for signs of wear, such as dullness, nicks, or cracks. The edges should feel relatively sharp. Also, ensure the burrs are free of caked-on coffee residue, which can impede their function. Check how the outer burr seats into the grinder; sometimes, misalignment prevents it from engaging correctly with the inner burr.
Step 4: Examine the Drive Mechanism (Coupling/Gears)
This step requires a bit more disassembly, typically involving removing the base or top housing of your grinder. Look for the component that connects the motor’s spinning shaft to the burr or blade assembly. This is often a plastic coupling, drive shaft, or a series of gears. Inspect these parts closely for any signs of stripping, cracks, or breakage. If the motor is spinning but these parts aren’t turning the grinding elements, it’s a strong indicator that one of these components has failed.
“The gears or coupling are the unsung heroes of your grinder. When they strip, the motor’s effort goes nowhere, leaving you with whole beans and a spinning motor.” – Admin, coffeegrinderchoice.com
Close-up of a damaged, stripped plastic drive coupling from a coffee grinder.
Step 5: Test Assembly
Once you’ve cleared obstructions or replaced a faulty part, reassemble your grinder carefully. Double-check that all components are correctly seated and tightened. Plug it back in and test it with a small handful of coffee beans. Listen for the normal grinding sound and observe if grounds are being produced consistently.
Step 6: Consider Professional Repair or Replacement
If you’ve followed all the steps and your grinder still isn’t working, or if the repair seems too complex, it might be time to weigh your options. For expensive, high-quality grinders, seeking professional repair might be cost-effective. However, for entry-level or older models, the cost of parts and labor can quickly exceed the price of a new grinder. Factor in the age of your machine and the availability of spare parts before committing to a costly repair.
Pro Tips for Grinder Maintenance
Preventing issues is always better than fixing them. Regular maintenance can significantly extend the life of your coffee grinder and ensure consistent performance.
- Regular Cleaning: Make cleaning a habit. Depending on usage, clean your grinder every 1-2 weeks by disassembling and brushing away old grounds and oils. Consider using specialized grinder cleaning tablets.
- Avoid Overfilling: Don’t overload the hopper. Grinding small batches can reduce strain on the motor and gears.
- No Flavored Beans: If you switch between different coffee types, especially flavored ones, always clean your grinder thoroughly. Residue can impact the taste of subsequent brews and potentially gum up the burrs.
- Grind Only Roasted Beans: Never put anything other than roasted coffee beans into your grinder. Grinding sugar, spices, or other foreign objects can damage the burrs or blades.
Conclusion
A coffee grinder that spins but doesn’t grind is a common mechanical hiccup, but often not a death knell for your beloved appliance. By systematically troubleshooting and inspecting the internal components, you can usually identify and rectify the issue yourself, whether it’s a simple clog, a worn coupling, or dull burrs. Regular maintenance is key to preventing these problems and ensuring your grinder continues to deliver the consistent, fresh grounds essential for an exceptional coffee experience. Don’t let a faulty grinder stand between you and your perfect brew – a little diagnosis can go a long way. What’s your go-to method for keeping your coffee grinder in top shape?
Frequently Asked Questions
Why does my coffee grinder motor run but the burrs don’t move?
This usually indicates a mechanical disconnection or obstruction. Common causes include clogged burrs, a stripped drive coupling or gears connecting the motor to the burrs, or improper assembly after cleaning. The motor is functioning, but its power isn’t being transferred to the grinding mechanism.
Can I fix a stripped coffee grinder gear myself?
Yes, it’s often possible to fix a stripped gear or drive coupling yourself, especially on common grinder models where replacement parts are readily available. This typically involves disassembling the grinder’s housing, identifying the damaged plastic gear or coupler, and replacing it with a new one. Always refer to your grinder’s specific service manual for detailed instructions.
How often should I clean my coffee grinder to prevent it from seizing?
To prevent clogging and maintain optimal performance, it’s recommended to perform a light cleaning every 1-2 weeks, and a deeper cleaning every month or two, depending on usage frequency and the oiliness of your coffee beans. Regular cleaning removes accumulated coffee oils and fines that can seize up the burrs.
What are the signs of worn-out coffee grinder burrs?
Signs of worn-out burrs include inconsistent grind size (more fines or boulders), a noticeably longer grinding time for the same amount of coffee, a louder or more strained sound during grinding, or the grinder struggling to process beans, even if the motor is spinning. Visually, the burr edges will appear dull rather than sharp.
Is it worth repairing an old coffee grinder?
The decision to repair or replace an old Coffee Grinder depends on several factors, including the cost of repair parts, labor fees (if hiring a professional), the original price of the grinder, and its overall condition. For high-end grinders, repairs are often worthwhile. For entry-level models, replacement might be more economical, especially if multiple components are failing or parts are hard to find.