For coffee enthusiasts, the pursuit of the perfect cup is a continuous journey. You meticulously select your beans, master your brewing technique, yet sometimes, the results fall short. That elusive balance of sweetness, acidity, and body seems just out of reach, leaving you with a cup that’s either too sour, too bitter, or simply muddled. The hidden culprit? Your coffee grinder’s burr alignment. This often-overlooked aspect of grinder maintenance can profoundly impact your coffee’s flavor, transforming a good bean into an extraordinary brew. By understanding and correcting burr misalignment, you unlock your coffee’s true potential, ensuring every sip is as consistent and delicious as you desire.
The Foundation of Flavor: Understanding Burr Alignment
At its core, burr alignment refers to the precise positioning of the two burrs within your coffee grinder. For optimal performance, the stationary and rotating burrs must be perfectly parallel and concentric to each other. When these cutting surfaces are ideally aligned, they create a uniform gap, allowing coffee beans to be crushed and sliced into consistently sized particles. This uniformity is paramount because it dictates how evenly water extracts flavors from your coffee grounds during brewing. Without proper alignment, the grinding process becomes haphazard, leading to a spectrum of particle sizes that can compromise your coffee’s quality.
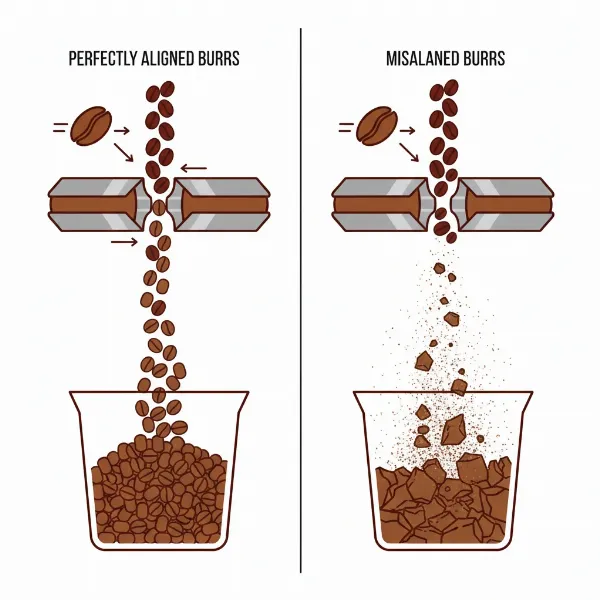 Illustration showing aligned coffee grinder burrs producing uniform grounds and misaligned burrs producing uneven grounds.
The Cost of Misalignment: Why It Matters for Your Coffee
Misaligned burrs are a silent saboteur of your coffee’s flavor profile. The consequences of this subtle imperfection are far-reaching and directly impact your brewing experience:
- Uneven Extraction: When burrs are misaligned, the gap between them is inconsistent. This means some coffee particles will be ground too coarsely (“boulders”), while others will be pulverized into ultra-fine dust (“fines”). During brewing, water flows rapidly through the coarse particles, leading to under-extraction and a sour taste. Simultaneously, it struggles to penetrate the dense clumps of fines, resulting in over-extraction and an unpleasant bitterness or astringency. The combination delivers a cup that is simultaneously sour and bitter, lacking balance and clarity.
- Channeling: Particularly problematic for espresso, channeling occurs when water finds paths of least resistance through the coffee puck, often along routes of coarser particles. Misaligned burrs exacerbate this issue by producing a highly uneven particle distribution, making it nearly impossible to achieve uniform water flow and consistent espresso shots.
- Muted Flavors: The unique characteristics and nuanced flavors of your coffee beans are developed during even extraction. When burrs are misaligned, the erratic extraction process obscures these delicate notes, leaving you with a dull, less vibrant, or “muddy” cup that fails to showcase the bean’s true potential.
- Inconsistent Results: Achieving a repeatable, high-quality brew becomes a frustrating guessing game when your burrs are out of alignment. Grind settings that worked perfectly one day might yield drastically different results the next, making it challenging to dial in your coffee and reproduce desirable flavors consistently.
“Misaligned burrs lead to uneven particle sizes, increased production of fines, and inconsistencies in extraction, which can degrade the quality of brewed coffee.”
Decoding the Signs: Is Your Grinder Misaligned?
Identifying burr misalignment often begins with your senses. Pay close attention to these common indicators:
- Taste Indicators: Your coffee tastes sour, bitter, or both simultaneously. You notice a lack of sweetness, a thin body, or an overall “muddy” sensation that doesn’t resolve with adjustments to your brewing parameters. The distinct flavor notes you expect from your beans might be muted or absent.
- Brewing Anomalies: In espresso, look for spurts of water channeling through the puck, or extremely fast/slow shot times that are difficult to control. For pour-over or drip coffee, you might observe an uneven “high and dry” coffee bed, where some grounds remain untouched by water, or significantly slower drain times due to excessive fines clogging the filter.
- Visual & Audible Cues: When inspecting your ground coffee, you might visually notice a wider distribution of particle sizes, with visible coarse chunks alongside fine powder. The “marker test” (detailed below) provides a clear visual cue of uneven burr contact. Additionally, when running your grinder at its finest setting until the burrs barely touch, an inconsistent or uneven “chirping” sound can indicate misalignment. A perfectly aligned grinder will produce a uniform chirp across the entire rotation.
- Grind Quality: If you constantly struggle to achieve a specific grind size, or if your grinder produces an unusually high amount of fines or “boulders” for your chosen setting, misalignment could be the cause.
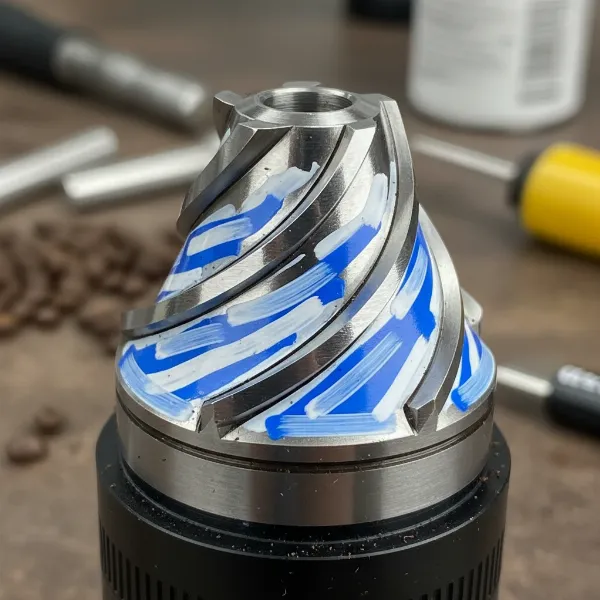 Close-up of a coffee grinder burr with marker ink partially wiped off, revealing high and low contact spots.
Your Alignment Toolkit: Essential Materials
Before embarking on the alignment process, gather the following simple tools:
- Whiteboard Marker (non-permanent): Essential for the marker test to identify high spots on your burrs. Avoid permanent markers, which can be difficult to remove.
- Thin Aluminum Foil: Your primary material for creating shims. Standard kitchen foil works perfectly.
- Screwdrivers: You’ll likely need a Philips head and/or a flathead screwdriver to disassemble your grinder and access the burrs. Consult your grinder’s manual for specifics.
- Cleaning Brush/Vacuum: A clean grinder is crucial for accurate alignment.
- Clean Workspace: A well-lit, organized area will prevent lost parts and frustration.
A Step-by-Step Guide to Burr Alignment
Aligning your grinder burrs is a patient and iterative process, but the improvements in your coffee are well worth the effort.
Step 1: Safety First & Preparation
|
Our Picks for the Best Coffee grinder in 2026
As an Amazon Associate I earn from qualifying purchases.
|
||
| Num | Product | Action |
|---|---|---|
| 1 | OXO Brew Conical Burr Coffee Grinder - Silver, Stainless Steel Burrs, One-Touch Automatic Smart Grind |

|
| 2 | Hamilton Beach Fresh Grind Electric Coffee Grinder for Beans, Spices and More, Stainless Steel Blades, Removable Chamber, Makes up to 12 Cups, Black |
|
| 3 | SHARDOR Professional Conical Burr Coffee Grinder, Coffee Bean Grinder with 48 Grind Settings for Espresso, Drip & French Press, Upgraded Anti-Static Technology, Precision Timer, Stainless Steel |
|
| 4 | Amazon Basics Electric Coffee Grinder, Coffee Bean and Spice Grinder, With Heavy-Duty Stainless Steel Grind Blades |
|
| 5 | Hamilton Beach Custom Grind Electric Coffee Grinder for 4-14 Cups, One-Press Hand-Free Operation with Auto Shutoff, Removable Grinding Bowl For Easy Pour and Clean, Stainless Steel (80406) |
|
| 6 | Wancle Electric Coffee Grinder, Spice Grinder, One Touch Coffee Mill for Beans, Spices and More, with Clean Brush Black |
|
| 7 | BLACK+DECKER One Touch Coffee Grinder, 2/3 Cup Coffee Bean Capacity, Spice Grinder, One Touch Push-Button Control -150 Watts -Stainless Steel Blades |
|
| 8 | Automatic Coffee Machine, 20-Bar Pressure Espresso Maker with Built-in Grinder, 15-Precision Settings, One-Touch Latte & Cappuccino System, Smart Self-Cleaning |
|
| 9 | Cuisinart Coffee Grinder, Electric One-Touch Automatic Burr Coffee Grinder with 18-Position Grind Selector, Cup Size Selector for 4 – 18 Cups, DBM-8P1, Black Stainless |
|
| 10 | Cuisinart Coffee Grinder, One Touch Control Coffee Bean Grinder with Stainless Steel Bowl and Blades, 2.5 oz/70g Capacity Enough for 12 Cups, On/Off Switch with Safety Interlock, DCG-20BKN, Black |
|
Always prioritize safety. Unplug your grinder from the power outlet before beginning any disassembly. Thoroughly clean your grinder, removing any residual coffee grounds or oils from the burrs and grinding chamber. Even a single stray ground can interfere with accurate alignment. Familiarize yourself with your grinder’s specific burr removal process, often found in the user manual. For most flat burr grinders, this involves removing the hopper and top burr carrier.
Step 2: The Marker Test – Uncovering Misalignment
The marker test is the cornerstone of burr alignment:
- Apply Marker: With one of your burrs (typically the stationary burr on the carrier) removed, use a whiteboard marker to draw several lines or completely color in the flat grinding surface.
- Reassemble & Test: Carefully reassemble the burr into its carrier and then reinstall the burr carrier back into the grinder. Do not tighten any screws fully yet, just enough to hold it in place.
- Find the Chirp Point: Adjust your grinder’s setting to its finest point, where the burrs are almost touching. With the grinder plugged in, briefly turn it on for just 1-2 seconds, listening for a slight “chirping” sound as the burrs make contact. Immediately turn it off. It is crucial to only let the burrs touch gently and briefly to avoid damage.
- Inspect Wipe Pattern: Disassemble the grinder again to remove the marked burr. Examine the marker lines. If the burrs are perfectly aligned, the marker should be wiped off evenly across the entire circumference of the burr. If the marker is wiped off only on one side or in specific spots, this indicates a “high spot” – where the burrs are making contact first. The areas where the marker remains are the “low spots.”
Step 3: Precision Shimming – Correcting the Imperfection
Once you’ve identified the high and low spots, it’s time for shimming:
- Identify Low Spots: The high spot is where the marker was wiped off. The low spots are the untouched areas, typically opposite the high spot.
- Prepare Shims: Cut small, thin pieces of aluminum foil. The thickness of the foil allows for minute adjustments.
- Place Shims: Carefully place a single layer of foil shim under the screws on the burr carrier, directly corresponding to the low spots you identified. The goal is to slightly raise the lower side of the burr to make it parallel with its counterpart.
- Reassemble & Re-test: Reassemble the burr and its carrier. Repeat the marker test (Step 2).
Step 4: Iterate and Refine
Burr alignment is rarely achieved in a single attempt. You’ll likely need to:
- Adjust Shim Thickness: If the marker wipe is still uneven, add another layer of foil to the persistently low spots, or remove a layer from areas that are now too high.
- Adjust Shim Placement: Experiment with placing shims under different screw points around the burr carrier.
- Patience is Key: This iterative process requires patience and attention to detail. The goal is to achieve an even wipe pattern across at least 80-90% of the burr’s surface. Once satisfied, fully tighten all screws and reassemble your grinder.
Beyond Alignment: Maintaining Optimal Grinder Performance
Achieving perfectly aligned burrs is a significant step, but maintaining that precision requires ongoing care:
- Regular Cleaning: Consistent cleaning prevents the build-up of coffee oils and grounds, which can accumulate unevenly and mimic misalignment over time. Use a brush or vacuum regularly to keep the grinding chamber clear.
- Gentle Handling: Avoid dropping or jarring your grinder, as this can easily shift burr alignment.
- Periodic Checks: Make the marker test a routine part of your grinder maintenance every few months, or whenever you notice a decline in grind consistency or coffee flavor.
By dedicating a little time to understanding and maintaining your grinder’s burr alignment, you gain unparalleled control over your coffee’s extraction, consistency, and ultimately, its flavor. It’s a small investment of effort that yields substantial rewards in every delicious cup.
Frequently Asked Questions
How often should I align my grinder burrs?
The frequency depends on your grinder’s usage and build quality. For enthusiasts, checking alignment every 3-6 months or whenever you notice a decline in coffee quality is a good practice. High-end grinders may hold alignment longer, while some entry-level models might benefit from more frequent checks.
Can burr alignment fix all my coffee taste issues?
While burr alignment significantly improves grind consistency and extraction, it’s one piece of the puzzle. Other factors like bean quality, freshness, water temperature, brew ratio, and brewing technique also play crucial roles. However, it addresses a fundamental issue that can dramatically enhance overall coffee flavor.
Is burr alignment necessary for all types of grinders?
Burr alignment is most critical for burr grinders (flat or conical) that produce consistent particle sizes. Blade grinders, which chop rather than grind, don’t have burrs and cannot be “aligned” in the same way. The impact of alignment is also more noticeable with finer grinds, such as those used for espresso.
What if my grinder doesn’t have screws to shim?
Some grinders, particularly certain hand grinders or models with fixed burr carriers, may not offer traditional shimming points. In such cases, some users explore rotating the burrs within their mounting positions to find a better fit, but extensive alignment might not be feasible without custom modifications.
Can I damage my grinder by attempting alignment?
It is possible to cause damage if not done carefully. The most common risk is allowing the burrs to spin against each other too aggressively during the marker test, which can wear down the burrs or strain the motor. Always unplug the grinder before disassembly, and only let the burrs touch briefly and gently when running the test.