Wrestling with a cloud of clingy coffee grounds every morning can turn your serene brewing ritual into a static-charged nightmare. Those tiny, electrically-charged particles scatter across your counter, stick to your grinder, and make precise dosing a frustrating challenge. But what if there was a simple, yet highly effective, trick to banish this messy problem for good? You’re about to discover the Ross Droplet Technique (RDT), a game-changer for any coffee enthusiast, alongside other smart strategies to achieve a cleaner, more consistent grind.
Understanding Coffee Grinder Static: The Science Behind the Mess
Before we dive into solutions, let’s unpack why coffee static occurs. The primary culprit is friction. As dry coffee beans rapidly tumble and grind against the burrs and internal surfaces of your grinder, electrons are transferred between the coffee particles and the grinder components. This exchange creates an imbalance of electrical charges, resulting in static electricity. Think of it like rubbing a balloon on your hair – the same principle applies, but with coffee grounds. [cite: 1, 2, 3 (search 3)]
Several factors can exacerbate this issue:
- Dryness: Coffee beans, especially darker roasts, tend to be drier, making them more prone to static buildup. Dry ambient air also increases static. [cite: 5 (search 1), 3 (search 2), 5 (search 3)]
- Grinder Materials: Plastic components in grinders or catch bins are insulators, meaning they don’t allow electrical charges to dissipate easily, leading to grounds clinging persistently.
- Grinding Speed: High-speed grinders can generate more friction, intensifying the static charge. [cite: 2 (search 3)]
The consequence? A frustrating mess of grounds clinging to your dosing cup, flying out of the chute, and impacting the accuracy of your coffee dose due to retention within the grinder. [cite: 1, 4 (search 3)]
The Ross Droplet Technique (RDT): Your Primary Weapon Against Static
Enter the Ross Droplet Technique, affectionately known as RDT. This simple yet highly effective method involves adding a minuscule amount of water to your whole coffee beans just before grinding. The added moisture dramatically increases the surface conductivity of the beans, allowing static charges to equalize and dissipate during the grinding process. [cite: 1, 2, 5 (search 1), 2 (search 2)]
How RDT Works Its Magic
|
Our Picks for the Best Coffee grinder in 2026
As an Amazon Associate I earn from qualifying purchases.
|
||
| Num | Product | Action |
|---|---|---|
| 1 | Cuisinart Coffee Grinder, Electric One-Touch Automatic Burr Coffee Grinder with 18-Position Grind Selector, Cup Size Selector for 4 – 18 Cups, DBM-8P1, Black Stainless |

|
| 2 | Automatic Coffee Machine, 20-Bar Pressure Espresso Maker with Built-in Grinder, 15-Precision Settings, One-Touch Latte & Cappuccino System, Smart Self-Cleaning |
|
| 3 | Cuisinart Coffee Grinder, One Touch Control Coffee Bean Grinder with Stainless Steel Bowl and Blades, 2.5 oz/70g Capacity Enough for 12 Cups, On/Off Switch with Safety Interlock, DCG-20BKN, Black |
|
| 4 | Wancle Electric Coffee Grinder, Spice Grinder, One Touch Coffee Mill for Beans, Spices and More, with Clean Brush Black |
|
| 5 | SHARDOR Professional Conical Burr Coffee Grinder, Coffee Bean Grinder with 48 Grind Settings for Espresso, Drip & French Press, Upgraded Anti-Static Technology, Precision Timer, Stainless Steel |
|
| 6 | BLACK+DECKER One Touch Coffee Grinder, 2/3 Cup Coffee Bean Capacity, Spice Grinder, One Touch Push-Button Control -150 Watts -Stainless Steel Blades |
|
| 7 | Amazon Basics Electric Coffee Grinder, Coffee Bean and Spice Grinder, With Heavy-Duty Stainless Steel Grind Blades |
|
| 8 | OXO Brew Conical Burr Coffee Grinder - Silver, Stainless Steel Burrs, One-Touch Automatic Smart Grind |
|
| 9 | Hamilton Beach Custom Grind Electric Coffee Grinder for 4-14 Cups, One-Press Hand-Free Operation with Auto Shutoff, Removable Grinding Bowl For Easy Pour and Clean, Stainless Steel (80406) |
|
| 10 | Hamilton Beach Fresh Grind Electric Coffee Grinder for Beans, Spices and More, Stainless Steel Blades, Removable Chamber, Makes up to 12 Cups, Black |
|
When you introduce a tiny bit of water, it creates a conductive pathway. As the beans are ground, this moisture helps to “ground” the static electricity, preventing it from building up on the coffee particles and the grinder’s internal components. The result is a much cleaner grind, with significantly fewer grounds clinging to surfaces or making a chaotic escape. [cite: 5 (search 3)]
Step-by-Step Guide to Applying RDT
Implementing RDT is straightforward and can be easily integrated into your daily brewing routine, especially if you single-dose your coffee.
- Dose Your Beans: Measure the precise amount of whole coffee beans you need for your brew. Place them into a small dosing cup, glass jar, or any suitable container.
- Apply Minimal Water: This is crucial – you only need a tiny amount.
- Spray Bottle Method: Use a small spray bottle to give your beans one or two light mists. A fine mist ensures even coverage without over-wetting. [cite: 1 (search 1), 2 (search 2)]
- Wet Spoon/Finger Method: Dip the back of a spoon or your finger into a small amount of water, then touch or stir the beans to transfer a single droplet or two. [cite: 5 (search 1), 4 (search 2)]
- Evenly Coat the Beans: Gently shake or swirl the container to distribute the moisture across all the coffee beans. Ensure they are lightly dampened, not wet.
- Grind Immediately: Transfer the moistened beans to your grinder and proceed with grinding as usual. You should notice an immediate reduction in static mess.
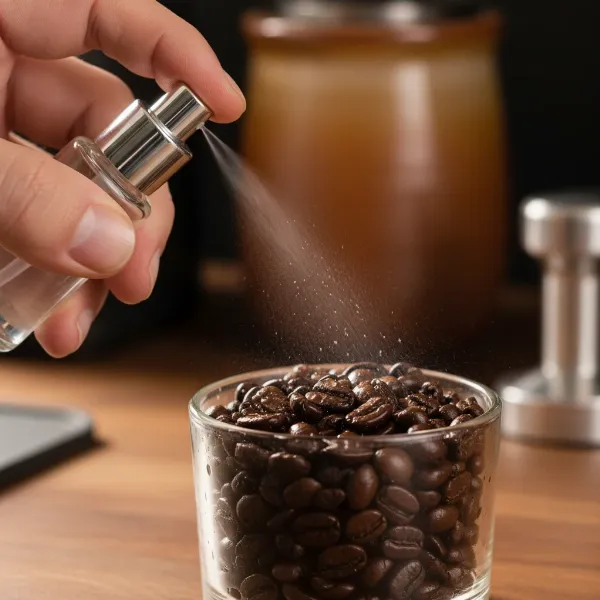 hand spraying coffee beans with water for rdt technique
Benefits of Incorporating RDT
Beyond just preventing mess, RDT offers several advantages:
- Significantly Reduces Static: This is the primary benefit, leading to a much cleaner grinding area.
- Lowers Retention: Less coffee will cling to the grinder’s internal parts or chute, ensuring you get nearly all of your precisely dosed coffee. [cite: 1 (search 1)]
- Cleaner Workflow: Say goodbye to chasing flying grounds and constant counter wiping.
- Potential for Enhanced Extraction: Some research suggests that RDT can improve coffee extraction by reducing clumping and promoting a more even grind particle distribution. [cite: 1 (search 1)]
Important Considerations Before Using RDT
While RDT is a powerful tool, it’s essential to be aware of potential drawbacks and best practices to ensure the longevity of your equipment and the quality of your coffee.
- Grinder Compatibility: RDT is best suited for single-dosing grinders where you add a measured amount of beans for each brew. It is generally not recommended for hopper-fed grinders, as adding moisture to a large batch of beans stored in the hopper can lead to mold growth, weaken bean cell structure over time, and potentially affect flavor. [cite: 3 (search 1)]
- Risk of Rust: The tiny amount of water used in RDT typically evaporates quickly due to the heat generated during grinding. However, cheaper steel burrs can be susceptible to rust over extended use. Ceramic burrs are a more rust-resistant alternative. It’s always a good idea to consult your grinder’s manufacturer to confirm if RDT is safe for your specific model. [cite: 1 (search 1), 2 (search 1)]
- Clumping and Clogging: Using too much water can lead to coffee grounds clumping excessively, potentially clogging your grinder’s chute or retention areas. Stick to one or two small drops or a very light mist. [cite: 4 (search 1)]
- Consistency is Key: For optimal and consistent results, integrate RDT into every grind. This helps maintain a “happy medium” that reduces both mess and potential issues like excessive fines. [cite: 1 (search 1)]
Beyond RDT: Other Strategies to Combat Coffee Grinder Static
While RDT is highly effective, it’s not the only weapon in your arsenal against coffee grinder static. Here are other methods you can employ, either as standalone solutions or in conjunction with RDT:
Increase Ambient Humidity
Static electricity thrives in dry environments. If you live in a particularly arid climate, increasing the humidity around your coffee setup can significantly reduce static. A small humidifier placed nearby can do wonders, aiming for around 60% relative humidity. [cite: 1 (search 2), 3 (search 1)]
Use a Metal Catch Bin
Unlike plastic, metal is a good conductor of electricity. If your grinder has a plastic catch bin, consider replacing it with a metal one if possible. Metal helps dissipate the electrical charge more effectively, preventing grounds from clinging to the container. [cite: 1 (search 2)]
Explore Grounding Techniques
Some advanced users modify their grinders to include grounding wires, essentially creating a path for static electricity to discharge. Others have found success by lining their plastic catch bins with aluminum foil, ensuring the foil contacts a grounded part of the grinder or even a separate ground wire. This can help conduct and dissipate static charges. [cite: 3, 4 (search 2)]
Allow Grounds to Settle
For those occasions when static is minor or you’re simply in no rush, allowing the freshly ground coffee to sit in the catch bin for a few minutes before opening can help the static charge dissipate naturally. However, remember that coffee begins to lose its aroma and flavor rapidly after grinding, so this method should be used cautiously to preserve freshness. [cite: 2, 3 (search 2)]
Consider Bean Characteristics
Darker roasted beans tend to be drier and, consequently, more prone to static. If you consistently experience high static, experimenting with lighter roasts might offer a small improvement. However, your preference for roast level should always come first!
Keep Your Grinder Cool
If you’re grinding multiple batches back-to-back, the heat generated by the motor can dry out beans further and amplify static. Allow your grinder to cool down between uses, especially if you notice increased static after prolonged operation. [cite: 1 (search 2)]
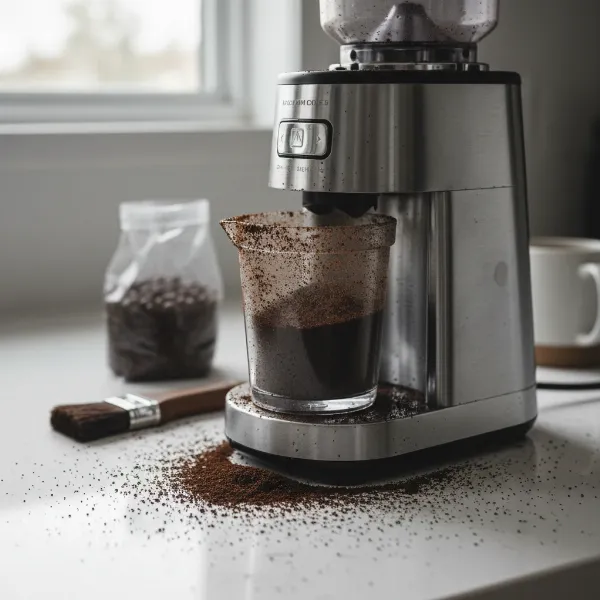 coffee grinder with messy static grounds on counter
Conclusion
Taming coffee grinder static doesn’t have to be an uphill battle. By understanding the science behind the mess and implementing smart techniques like the Ross Droplet Technique, you can transform your coffee preparation from a frustrating chore into a clean, enjoyable experience. RDT, with its simple application of minimal moisture, stands out as a highly effective method for reducing static, improving grind consistency, and minimizing retention. Combine it with other strategies like maintaining humidity or using metal catch bins, and you’ll unlock a smoother, more satisfying coffee ritual.
What’s your go-to method for keeping static at bay in your Coffee Grinder?
Frequently Asked Questions
Does the RDT method affect the taste of coffee?
When performed correctly with just one or two small drops of water, the RDT method should not impact the flavor of your coffee. The minimal moisture evaporates almost instantly during the grinding process due to the heat and friction, leaving no detectable taste alteration. The primary goal is to address static, not to add water to your brew.
Can I use RDT on any type of coffee grinder?
RDT is most suitable for single-dosing grinders where you add beans for one brew at a time. It is not recommended for grinders with large hoppers, as adding water to a large volume of beans can lead to inconsistent moisture distribution, potential mold growth, and faster staling of the coffee over time.
How much water is too much for RDT?
Typically, one to two small drops or a very light mist from a fine spray bottle is sufficient for an average dose of coffee (e.g., 15-20 grams). Using too much water can cause coffee grounds to clump excessively, potentially clogging the grinder, and may introduce undesirable moisture into the grinding chamber, increasing the risk of rust.
What are the signs of excessive static in a coffee grinder?
Common signs include coffee grounds clinging persistently to the sides of the catch bin or dosing cup, grounds flying out of the grinder chute, and a noticeable mess on your counter after grinding. You might also experience lower-than-expected coffee output due to retention within the grinder.