Does your morning brew taste a bit off, despite using fresh beans? The culprit might be your trusty hand grinder. Over time, coffee oils and fine particles accumulate within its intricate mechanisms, leading to rancidity and a diminished flavor profile for your freshly ground coffee. Just like any precision tool, a hand grinder benefits from a thorough deep clean to maintain optimal performance and ensure every cup delivers the rich, nuanced flavors you crave. This guide will walk you through the essential steps to safely disassemble, meticulously clean, and correctly reassemble your hand coffee grinder, transforming your brewing experience.
Why Deep Clean Your Hand Grinder?
Regular cleaning is paramount for any coffee grinder, and hand grinders are no exception. As beans are ground, they release natural oils and microscopic coffee particles. These residues cling to the burrs, shaft, and internal chambers. With repeated use, these oils can turn rancid, imparting an unpleasant, bitter taste to your coffee. Stale grounds mix with fresh ones, creating a muddy and inconsistent flavor. A deep clean removes these build-ups, preventing cross-contamination of flavors, ensuring uniform grind size, and ultimately elevating the quality of your daily coffee ritual. It also prolongs the lifespan of your grinder by preventing wear from abrasive build-up.
Understanding Your Hand Grinder’s Anatomy
Before you begin disassembly, it’s helpful to familiarize yourself with the common parts of most hand grinders. While designs vary, the core components are generally similar:
- Handle: Attaches to the central shaft to turn the burrs.
- Hopper/Lid: Where whole beans are loaded.
- Grind Catcher (Grounds Container): Collects the ground coffee.
- Adjustment Mechanism: A dial, knob, or ring that controls the distance between the burrs, determining grind size.
- Burrs: The grinding elements. Most hand grinders use conical burrs, consisting of an inner burr (often attached to the central shaft) and an outer burr (fixed to the grinder body or removable).
- Central Shaft: The rod that runs through the grinder, connecting the handle to the inner burr.
- Springs & Washers: Small components that provide tension and proper spacing for the burr assembly and adjustment mechanism.
Recognizing these parts will make the disassembly and reassembly process much smoother.
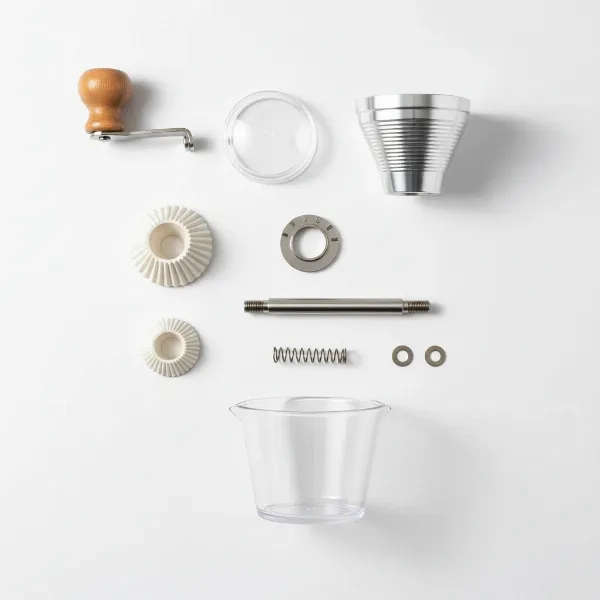 Close-up of a disassembled hand coffee grinder with its key parts laid out on a clean surface.
Tools You Might Need
Fortunately, deep cleaning a hand grinder typically requires minimal specialized tools. Most models can be taken apart with just your hands. However, some grinders, especially those with more complex or robust designs, might benefit from:
- A cleaning brush: Often included with your grinder, ideal for sweeping away grounds.
- Paper towels or a clean cloth: For wiping away coffee oils.
- A small screwdriver or hex wrench: Some specific models (like certain MOMENTEM or 1Zpresso grinders) may have small screws or bolts that secure the burr assembly or other components. Check your grinder’s manual if you’re unsure.
- A flat surface with a white towel: This creates a visible and contained workspace, preventing small parts from rolling away or getting lost.
Preparation Before Disassembly
Preparation is key to a hassle-free cleaning experience.
- Choose your workspace: Select a well-lit, flat, and stable surface. Lay down a clean white towel or cloth. This provides a soft landing for parts and makes small components easily visible against the contrasting background.
- Empty the grinder: Ensure the hopper and grind catcher are completely empty of coffee beans and grounds.
- Take photos (optional but recommended): As you disassemble, take pictures at each step. These photos will be invaluable when it comes time to reassemble your grinder, especially for remembering the order of washers and springs.
- Organize parts: Keep disassembled parts organized in the order they were removed. A small tray or container can be helpful for tiny components.
Step-by-Step Disassembly Guide
While specifics can vary by model, the general sequence for disassembling a hand grinder is as follows:
1. Remove External Components
Start by detaching the most accessible parts.
- Remove the handle: Most handles simply slide off the central shaft or are secured by a small screw. Unscrew or slide it off and set it aside.
- Remove the hopper lid: This usually just lifts off.
- Unscrew the grounds catcher: This typically twists off the bottom of the grinder body.
|
Our Picks for the Best Coffee grinder in 2026
As an Amazon Associate I earn from qualifying purchases.
|
||
| Num | Product | Action |
|---|---|---|
| 1 | BLACK+DECKER One Touch Coffee Grinder, 2/3 Cup Coffee Bean Capacity, Spice Grinder, One Touch Push-Button Control -150 Watts -Stainless Steel Blades |

|
| 2 | Wancle Electric Coffee Grinder, Spice Grinder, One Touch Coffee Mill for Beans, Spices and More, with Clean Brush Black |
|
| 3 | Cuisinart Coffee Grinder, One Touch Control Coffee Bean Grinder with Stainless Steel Bowl and Blades, 2.5 oz/70g Capacity Enough for 12 Cups, On/Off Switch with Safety Interlock, DCG-20BKN, Black |
|
| 4 | OXO Brew Conical Burr Coffee Grinder - Silver, Stainless Steel Burrs, One-Touch Automatic Smart Grind |
|
| 5 | SHARDOR Professional Conical Burr Coffee Grinder, Coffee Bean Grinder with 48 Grind Settings for Espresso, Drip & French Press, Upgraded Anti-Static Technology, Precision Timer, Stainless Steel |
|
| 6 | Automatic Coffee Machine, 20-Bar Pressure Espresso Maker with Built-in Grinder, 15-Precision Settings, One-Touch Latte & Cappuccino System, Smart Self-Cleaning |
|
| 7 | Hamilton Beach Custom Grind Electric Coffee Grinder for 4-14 Cups, One-Press Hand-Free Operation with Auto Shutoff, Removable Grinding Bowl For Easy Pour and Clean, Stainless Steel (80406) |
|
| 8 | Amazon Basics Electric Coffee Grinder, Coffee Bean and Spice Grinder, With Heavy-Duty Stainless Steel Grind Blades |
|
| 9 | Cuisinart Coffee Grinder, Electric One-Touch Automatic Burr Coffee Grinder with 18-Position Grind Selector, Cup Size Selector for 4 – 18 Cups, DBM-8P1, Black Stainless |
|
| 10 | Hamilton Beach Fresh Grind Electric Coffee Grinder for Beans, Spices and More, Stainless Steel Blades, Removable Chamber, Makes up to 12 Cups, Black |
|
2. Detach the Adjustment Mechanism
This is where you control your grind size.
- Locate the adjustment knob/dial: This is often at the bottom, just above the grounds catcher, or sometimes at the top under the handle.
- Unwind/unscrew the knob: Turn it counter-clockwise until it detaches completely. For some grinders, this might involve turning the dial past its coarsest setting. Be mindful of any small detent balls or springs that might pop out if the mechanism is designed that way, though this is less common for full disassembly.
- Remove any associated washers or scales: The adjustment mechanism might have a numbered scale or thin washers that need to be removed in a specific order. Note their orientation.
3. Extract the Inner Burr Assembly
This is the core grinding component.
- Remove the inner burr: Once the adjustment mechanism is off, the inner burr (which moves) should be able to slide out, often along with the central shaft. Gently pull it upwards from the grinder body.
- Carefully remove springs and washers: As the inner burr and shaft come out, small components like a spring, metal washer, or plastic washer will likely be revealed. Pay very close attention to their order and orientation. These are crucial for proper burr alignment and tension.
- Separate the inner burr from the shaft: In many designs, the inner burr is fixed to the central shaft, but in some, it can be detached. If it comes apart, keep track of how it fits.
4. (Optional) Remove Outer Burr
In some hand grinders, the outer burr (the stationary one) is fixed to the main body and does not need to be removed for cleaning. However, in other designs, it might be detachable.
- Inspect the outer burr: See if it can be unscrewed, twisted, or pulled out from the main casing. If it’s firmly fixed, do not force it. It can usually be cleaned in place.
- Note any locking mechanisms: If detachable, there might be small tabs or grooves that lock it into place.
You now have a fully disassembled hand grinder! All the components are separate and ready for a thorough cleaning.
Deep Cleaning Your Grinder Components
With your grinder in pieces, it’s time to banish those stale oils and grounds.
- Cleaning Burrs: This is the most critical step. Use the cleaning brush (or a stiff toothbrush) to vigorously brush away all trapped coffee grounds from both the inner and outer burrs. For stubborn, oily residue, use a dry paper towel to wipe them down. Avoid water or soap on the burrs if possible, as it can cause rust or leave residue that affects flavor. If absolutely necessary, a slightly damp cloth followed by immediate and thorough drying is acceptable for ceramic burrs.
- Cleaning Other Parts: Wipe down the central shaft, springs, washers, and the inside of the grinder body with a dry cloth or paper towel to remove any fine dust or oily film. You can use a mild detergent and water for the grind catcher and hopper lid, as these parts don’t directly contact the grinding process, but ensure they are completely dry before reassembly.
- Bearings (if exposed): If your grinder has exposed bearings, avoid getting water or cleaning solutions on them, as this can degrade their lubrication and performance. Simply brush away any loose grounds.
“A common mistake is thinking a quick brush is enough. The true enemy of fresh coffee flavor is the rancid oil that clings to the burrs, so a thorough wipe-down after brushing is crucial.” – Admin, coffeegrinderchoice.com
Person actively cleaning the burrs of a hand coffee grinder with a small brush to remove old coffee grounds.
Reassembly Tips and Tricks
Putting your grinder back together is essentially the reverse of disassembly, but a few pointers will ensure it goes smoothly.
- Reverse the steps: Start with the last part you removed and work your way backward. Refer to any photos you took.
- Pay attention to washers and springs: These are the most common culprits for reassembly errors. Ensure they are placed in the correct order and orientation as they were during disassembly. Incorrect placement can lead to wobbly burrs, inconsistent grind, or difficulty in adjusting grind size.
- Align the burrs: When inserting the inner burr assembly, make sure it seats properly within the outer burr. There are often guiding grooves or pins.
- Tighten components securely, but don’t overtighten: Ensure everything is snug, but avoid excessive force, especially with plastic parts or fine threads, to prevent damage.
- Calibration (if applicable): Some high-end hand grinders (e.g., 1Zpresso models) benefit from re-calibrating the “zero point” after reassembly. This involves adjusting the grind setting to its tightest point (where the burrs just touch) and ensuring the adjustment dial aligns with a specific mark. Consult your grinder’s manual for specific calibration instructions if needed.
Troubleshooting Common Disassembly/Reassembly Issues
Even with careful steps, you might encounter minor hurdles.
- Stuck parts: If a component feels stiff, avoid forcing it. Double-check for hidden screws or locking mechanisms. Sometimes, a gentle tap on a flat surface can help loosen a tight burr assembly.
- Losing small parts: This is why a white towel and organized workspace are recommended. If a part rolls away, systematically search the area. These tiny components are essential for your grinder’s functionality.
- Grinder feels wobbly after reassembly: This often indicates incorrect placement of a washer or spring, or that the burr assembly isn’t fully seated. Disassemble the relevant section and re-check the order.
- Difficulty adjusting grind size: Ensure the adjustment mechanism is correctly threaded and that any associated pins or detents are aligned.
How Often Should You Deep Clean Your Hand Grinder?
The frequency of deep cleaning depends on your usage:
- Daily users: A deep clean every 2-4 weeks is advisable, especially if you grind oily, dark roasted beans.
- Occasional users (2-3 times a week): Every 1-2 months should suffice.
- Light users: Every 3 months or so.
Between deep cleans, you can do a quick clean by brushing out residual grounds or grinding a small amount of ‘grinder cleaning tablets’ (made of food-safe grains) to absorb oils.
Conclusion
A clean hand grinder is the cornerstone of excellent home brewing. By taking the time to disassemble, meticulously clean, and carefully reassemble your device, you actively preserve the integrity of your coffee’s flavor and extend your grinder’s lifespan. This ritual of maintenance isn’t just about cleaning; it’s about nurturing your passion for coffee, ensuring that every grind, every brew, and every sip is as perfect as it can be. So, when was the last time your hand grinder truly sparkled?
Frequently Asked Questions
Why does my coffee taste bitter after grinding?
A bitter taste in your coffee, especially if you’re using fresh beans, is often a sign of rancid coffee oils and stale grounds accumulating in your grinder’s burrs. These residues impart undesirable flavors to your fresh coffee.
Can I wash my hand grinder burrs with water?
It’s generally recommended to avoid washing grinder burrs with water, especially metal burrs, as this can lead to rust. For ceramic burrs, if you must use water, ensure they are thoroughly and immediately dried. A dry brush and paper towel are usually sufficient for removing grounds and oils.
How do I know if my hand grinder needs deep cleaning?
You’ll notice signs like a diminished or “off” flavor in your coffee, inconsistent grind size, increased effort required to grind, or visible build-up of oily residue and grounds on the burrs when you inspect them.
What are the most common parts to lose during disassembly?
The tiny washers, springs, and sometimes small detent balls from the adjustment mechanism are the most commonly misplaced parts. Working over a white towel and keeping parts organized can help prevent this.
My grinder feels wobbly after reassembly. What should I check?
A wobbly burr assembly typically indicates that a washer or spring has been placed incorrectly or that the burr assembly isn’t fully seated. Carefully retrace your reassembly steps, paying close attention to the order and orientation of these small components.