Achieving that perfect cup of coffee starts with freshly ground beans, but the secret to consistently great flavor often lies in something simpler: a clean burr grinder. Over time, coffee oils and fine particles accumulate, leading to stale flavors and potentially impacting your grinder’s performance. Many coffee enthusiasts dread the thought of a full-scale disassembly, but the good news is you can keep your burr grinder in pristine condition with quick, effective cleaning methods that require minimal effort and no complicated tools. This guide will walk you through easy, non-disassembly techniques to ensure every brew tastes as fresh as possible.
Why a Clean Burr Grinder Matters for Your Coffee
A burr grinder is an investment in your daily coffee ritual, and like any precision tool, it requires proper care. The primary reason to keep it clean is flavor. As coffee beans are ground, they release natural oils, which, along with tiny coffee particles, adhere to the burrs and internal components. Over time, these oils become rancid, imparting a stale, bitter, or off-flavor to your freshly ground coffee. Even if you’re using the highest quality beans, a dirty grinder will undermine their potential, delivering a less-than-optimal brew.
Beyond taste, consistent cleaning extends your grinder’s lifespan and maintains its performance. Accumulating grounds and sticky oils can clog the grinding chamber and chute, forcing the motor to work harder and potentially leading to premature wear or even damage. Regular maintenance prevents these issues, ensuring your grinder operates efficiently, delivers consistent grind sizes, and continues to produce delicious coffee for years to come. It’s a simple habit that pays dividends in both taste and longevity.
 A person enjoying a delicious cup of coffee, symbolizing the benefits of a clean burr grinder for superior taste.
Essential Tools for a Non-Disassembly Clean
You don’t need a workshop full of specialized gadgets to effectively clean your burr grinder. Most of what you need can be found around the house or purchased affordably. Here’s a list of essential tools for a thorough cleaning without complex disassembly:
- Soft Bristle Brush: A dedicated grinder brush often comes with your machine, but a clean, stiff paintbrush or an unused toothbrush works just as well. This is your primary tool for dislodging stuck grounds from the burrs and chute.
- Vacuum Cleaner with Hose Attachment: An essential for extracting loose coffee dust and crumbs from hard-to-reach areas. The narrow hose attachment is perfect for this task.
- Dust Blower (Optional): Similar to what photographers use for camera lenses, a hand-powered dust blower can help dislodge stubborn particles with a blast of air.
- Grinder Cleaning Tablets: Products like Urnex Grindz are specially formulated, food-safe tablets designed to absorb coffee oils and dislodge stale grounds. They are an incredibly effective and easy way to deep clean without taking your grinder apart.
- Dry Cloth or Paper Towels: For wiping down external surfaces, the hopper, and the grounds bin.
- Small Pick (Wooden or Plastic): A wooden toothpick or a plastic coffee stirrer can be helpful for carefully dislodging grounds from very tight crevices, particularly around the burrs.
Step-by-Step Guide: Cleaning Your Burr Grinder Without Taking It Apart
Keeping your burr grinder spotless doesn’t have to be a daunting task. Follow these simple steps for an effective clean that maintains your coffee’s flavor and your grinder’s efficiency, all without the hassle of full disassembly.
1. Safety First: Unplug and Empty
|
Our Picks for the Best Coffee grinder in 2026
As an Amazon Associate I earn from qualifying purchases.
|
||
| Num | Product | Action |
|---|---|---|
| 1 | SHARDOR Professional Conical Burr Coffee Grinder, Coffee Bean Grinder with 48 Grind Settings for Espresso, Drip & French Press, Upgraded Anti-Static Technology, Precision Timer, Stainless Steel |

|
| 2 | Wancle Electric Coffee Grinder, Spice Grinder, One Touch Coffee Mill for Beans, Spices and More, with Clean Brush Black |
|
| 3 | OXO Brew Conical Burr Coffee Grinder - Silver, Stainless Steel Burrs, One-Touch Automatic Smart Grind |
|
| 4 | Amazon Basics Electric Coffee Grinder, Coffee Bean and Spice Grinder, With Heavy-Duty Stainless Steel Grind Blades |
|
| 5 | Cuisinart Coffee Grinder, One Touch Control Coffee Bean Grinder with Stainless Steel Bowl and Blades, 2.5 oz/70g Capacity Enough for 12 Cups, On/Off Switch with Safety Interlock, DCG-20BKN, Black |
|
| 6 | Cuisinart Coffee Grinder, Electric One-Touch Automatic Burr Coffee Grinder with 18-Position Grind Selector, Cup Size Selector for 4 – 18 Cups, DBM-8P1, Black Stainless |
|
| 7 | BLACK+DECKER One Touch Coffee Grinder, 2/3 Cup Coffee Bean Capacity, Spice Grinder, One Touch Push-Button Control -150 Watts -Stainless Steel Blades |
|
| 8 | Hamilton Beach Fresh Grind Electric Coffee Grinder for Beans, Spices and More, Stainless Steel Blades, Removable Chamber, Makes up to 12 Cups, Black |
|
| 9 | Automatic Coffee Machine, 20-Bar Pressure Espresso Maker with Built-in Grinder, 15-Precision Settings, One-Touch Latte & Cappuccino System, Smart Self-Cleaning |
|
| 10 | Hamilton Beach Custom Grind Electric Coffee Grinder for 4-14 Cups, One-Press Hand-Free Operation with Auto Shutoff, Removable Grinding Bowl For Easy Pour and Clean, Stainless Steel (80406) |
|
Before you begin any cleaning, always ensure your grinder is unplugged from the power source. This eliminates any risk of accidental activation. Once unplugged, remove all remaining coffee beans from the hopper. Run the grinder briefly (if it’s electric) to process any beans still in the burr chamber, then empty the grounds bin completely.
2. Remove Easily Accessible Parts
Most burr grinders allow for the easy removal of the hopper and the grounds bin. For many models, the upper burr assembly can also be removed with a simple twist or pull, without needing tools. This is crucial as it provides direct access to the grinding mechanism. Carefully remove these components and set them aside.
3. Brush Away Loose Grounds
With the upper burr removed (if applicable) and the grinding chamber exposed, use your soft bristle brush to meticulously sweep away any visible coffee grounds and dust from the burrs themselves. Pay close attention to the teeth of both the upper and lower burrs, as well as the surrounding internal surfaces and the coffee chute where grounds exit. For any particularly stubborn bits in tight spots, a wooden or plastic pick can be gently employed to loosen them.
4. Vacuum Up Debris
After brushing, use the hose attachment of your vacuum cleaner to thoroughly suck out all the loosened coffee grounds and fine dust. Carefully maneuver the nozzle around the burrs, inside the grinding chamber, and especially into the chute. This step is highly effective for removing particles that brushing alone might miss or simply move around.
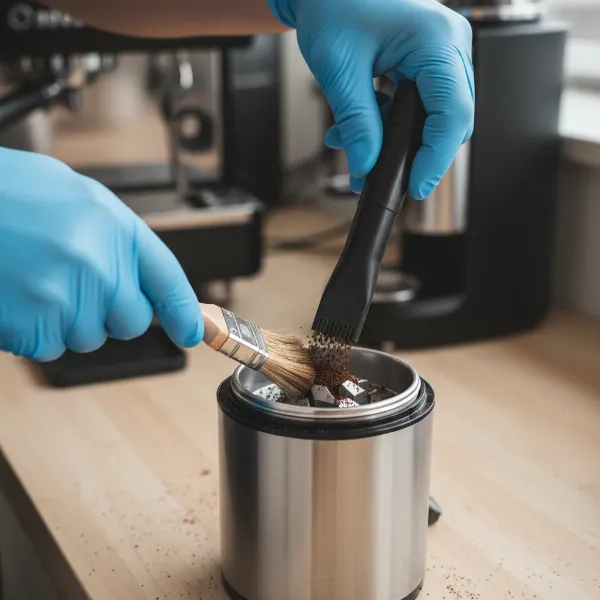 Hands using a small brush and a vacuum attachment to clean coffee grounds from a burr grinder's interior.
5. Consider Grinder Cleaning Tablets
For a deeper clean that tackles stubborn coffee oils and embedded grounds, grinder cleaning tablets are an excellent option. Simply follow the product instructions, which typically involve running a recommended amount of tablets through the grinder as you would coffee beans. The tablets absorb oils and dislodge particles without scratching or damaging the burrs. After running the tablets, follow up by grinding a small amount of old, inexpensive coffee beans to clear out any tablet residue.
6. Wipe Down Exterior and Removable Parts
While the internal cleaning focuses on dry methods, you can clean the removable hopper and grounds bin more thoroughly. Wipe them down with a dry cloth or paper towel to remove any oily residue. If needed, these plastic components can be washed with a mild detergent and water, but it is absolutely crucial to dry them completely before reassembling. For the exterior of the grinder, a damp cloth can be used to wipe away smudges, followed by a dry cloth. Never use water or damp cloths on the internal electrical components or directly on the burrs.
7. Reassemble and Test
Once all components are clean and thoroughly dry, carefully reassemble your grinder. Ensure the burrs are properly seated and secured according to your grinder’s specific design. Once everything is back in place, plug in your grinder and perform a quick test grind with a small amount of fresh beans to ensure it’s functioning correctly and to “season” the burrs with fresh coffee oils before your next brew.
Frequency of Cleaning: How Often is Enough?
The ideal cleaning frequency for your burr grinder depends on how often you use it and the type of coffee you grind. For most home users, a practical approach involves a combination of routine maintenance and periodic deep cleaning.
For daily or weekly users, a “light touch-up” is usually sufficient. This involves quickly brushing away visible grounds from the burrs and chute and wiping down the hopper and grounds bin. This prevents the rapid accumulation of stale coffee and oils.
A more thorough cleaning, incorporating a vacuum and potentially grinder cleaning tablets, is recommended monthly or bi-monthly, especially if you notice a decline in coffee flavor or inconsistent grind sizes. If you frequently switch between different coffee roasts or use oily, dark roast beans, you might consider a deeper clean every two to three weeks. It’s important to avoid “grinder OCD” – over-cleaning can be unnecessary and sometimes leads to more frequent disassembly than required, which can wear down components over time. Listen to your coffee and your grinder; they’ll often tell you when it’s time for a clean.
What to Avoid When Cleaning Your Burr Grinder
While keeping your burr grinder clean is vital, certain cleaning practices can do more harm than good. Knowing what to avoid is just as important as knowing what to do.
Firstly, never use water or any liquid cleaners directly on the burrs or inside the grinding chamber. Moisture is the enemy of a coffee grinder. It can cause coffee grounds to clump and gum up the mechanism, promote mold and bacterial growth, and, for grinders with steel burrs, lead to rust or corrosion. Internal components, especially electrical ones, should remain dry. Only removable plastic parts like the hopper and grounds bin should ever be washed with water, and then dried meticulously.
Secondly, do not use uncooked rice to clean your grinder. This is a common, but ill-advised, old-school tip. Uncooked rice grains are hard and brittle, posing a risk of damaging your grinder’s burrs or, worse, jamming the motor, which can lead to expensive repairs or a completely broken machine. Stick to purpose-designed grinder cleaning tablets if you want a granular cleaning agent.
Lastly, avoid harsh chemical cleaners or abrasive materials. These can leave residues that taint the taste of your coffee, damage the burr coating, or even degrade plastic components. Always opt for gentle methods and cleaning products specifically designed for coffee equipment.
Conclusion
Maintaining a clean burr grinder is a simple yet profoundly impactful practice for any coffee lover. By regularly removing stale coffee grounds and rancid oils, you not only preserve the authentic flavor profile of your cherished beans but also extend the operational life of your valuable equipment. These easy, non-disassembly cleaning methods ensure that your journey from bean to cup remains consistently fresh and delightful, without the need for complex tools or time-consuming efforts. Embrace these habits, and your taste buds—and your grinder—will thank you.
What’s your favorite quick tip for keeping your grinder sparkling clean?
Frequently Asked Questions
Can I use rice to clean my coffee grinder?
No, it is strongly advised against using uncooked rice to clean your Coffee Grinder. Rice grains are hard and brittle, which can potentially damage the burrs or even jam and break the motor of your grinder. Specialized grinder cleaning tablets are a much safer and more effective alternative.
How often should I clean my burr grinder?
For daily users, a light brush-and-wipe cleaning is recommended weekly. A more thorough cleaning, possibly involving grinder cleaning tablets, should be done monthly or bi-monthly, depending on usage frequency and the oiliness of your coffee beans.
What happens if I don’t clean my coffee grinder?
Neglecting to clean your burr grinder can lead to several problems. Stale coffee oils and old grounds build up, imparting a bitter or rancid taste to your fresh coffee. Additionally, this accumulation can clog the grinder, reduce its efficiency, strain the motor, and shorten its overall lifespan.
What tools do I need for cleaning without disassembly?
For cleaning without full disassembly, you’ll need a soft bristle brush (like a grinder brush or an old toothbrush), a vacuum cleaner with a hose attachment, and optionally, grinder cleaning tablets and a small pick. A dry cloth is also useful for wiping external surfaces.