Has your trusty electric coffee grinder suddenly gone silent, refusing to whir to life despite being plugged in? Before you mourn its demise or rush to buy a new one, consider a common culprit: a blown fuse. Often an overlooked component, the fuse acts as a critical safety mechanism, protecting your grinder from electrical damage. Replacing it can be a straightforward fix, bringing your beloved grinder back into action and ensuring your morning brew ritual remains uninterrupted. This guide will walk you through everything you need to know, from understanding why a fuse blows to the step-by-step process of replacing it safely and effectively.
Understanding Your Grinder’s Fuse
At its core, a fuse is a small, sacrificial component designed to protect electrical circuits from overcurrent. Think of it as a safety valve: when too much electrical current flows through the circuit – perhaps due to an electrical surge, a motor overload, or a short circuit – the thin wire inside the fuse heats up and melts, “blowing” the fuse and breaking the circuit. This immediately cuts off power to the appliance, preventing more serious damage to the grinder’s motor or internal components, and safeguarding against potential fire hazards.
Fuses in electric grinders typically come in two main types:
- Cartridge Fuses: These are usually cylindrical glass or ceramic tubes with metal caps on the ends. They are often found in an external holder, accessible without opening the grinder’s casing.
- Thermal Fuses: More commonly integrated directly into the grinder’s internal wiring, often near the motor. These fuses react specifically to overheating, blowing when the grinder’s internal temperature exceeds a safe limit. Replacing a thermal fuse typically requires opening the appliance and may involve soldering.
Understanding which type of fuse your grinder uses will inform your replacement approach.
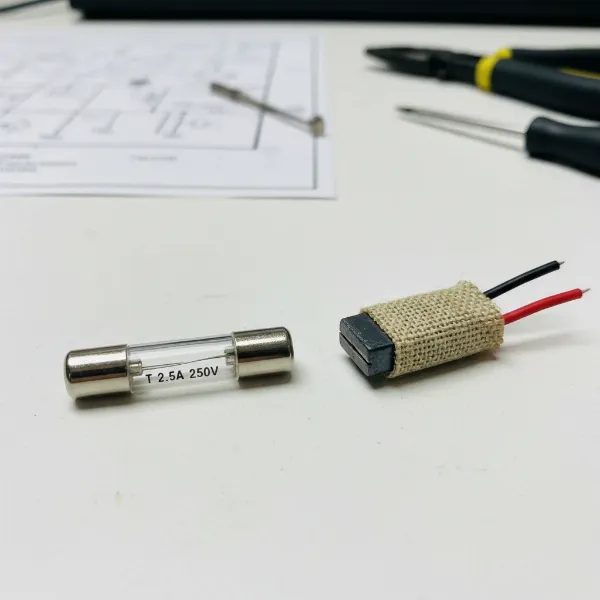 Different types of fuses, including glass cartridge and thermal fuses, for electric coffee grinders.
Before You Begin: Safety First
Working with any electrical appliance carries inherent risks, so prioritizing safety is paramount. Always ensure you follow these precautions before attempting any repair:
- Unplug Your Grinder: This is the most crucial step. Always disconnect your grinder from the power outlet completely before you touch any internal or external components. Never assume the grinder is off just because the switch is in the “off” position.
- Gather Your Tools: You’ll likely need a few basic tools:
- Screwdriver set: To open fuse caps or the grinder’s casing.
- Multimeter (optional but recommended): To test if a fuse is truly blown.
- Needle-nose pliers: Useful for grasping small fuses.
- Replacement Fuse(s): Make sure you have the correct type and rating.
- Work in a Well-Lit Area: Good lighting will help you clearly see what you’re doing and prevent errors.
- Gloves (optional): If you’re concerned about handling small components.
Taking these simple safety steps will help ensure a smooth and secure repair process.
Locating the Fuse in Your Electric Grinder
The location of your grinder’s fuse can vary depending on its design and manufacturer. Here are the most common places to look:
External Fuses (Cartridge Type)
Many electric grinders, particularly older models or those designed for easy user maintenance, feature an externally accessible fuse holder. This is typically a small cap or compartment located:
- Near the power cord inlet on the back or bottom of the grinder.
- Integrated into the main power switch.
- In a small compartment on the underside of the grinder.
|
Our Picks for the Best Coffee grinder in 2026
As an Amazon Associate I earn from qualifying purchases.
|
||
| Num | Product | Action |
|---|---|---|
| 1 | BLACK+DECKER One Touch Coffee Grinder, 2/3 Cup Coffee Bean Capacity, Spice Grinder, One Touch Push-Button Control -150 Watts -Stainless Steel Blades |

|
| 2 | OXO Brew Conical Burr Coffee Grinder - Silver, Stainless Steel Burrs, One-Touch Automatic Smart Grind |
|
| 3 | Hamilton Beach Fresh Grind Electric Coffee Grinder for Beans, Spices and More, Stainless Steel Blades, Removable Chamber, Makes up to 12 Cups, Black |
|
| 4 | Cuisinart Coffee Grinder, One Touch Control Coffee Bean Grinder with Stainless Steel Bowl and Blades, 2.5 oz/70g Capacity Enough for 12 Cups, On/Off Switch with Safety Interlock, DCG-20BKN, Black |
|
| 5 | Hamilton Beach Custom Grind Electric Coffee Grinder for 4-14 Cups, One-Press Hand-Free Operation with Auto Shutoff, Removable Grinding Bowl For Easy Pour and Clean, Stainless Steel (80406) |
|
| 6 | Automatic Coffee Machine, 20-Bar Pressure Espresso Maker with Built-in Grinder, 15-Precision Settings, One-Touch Latte & Cappuccino System, Smart Self-Cleaning |
|
| 7 | Cuisinart Coffee Grinder, Electric One-Touch Automatic Burr Coffee Grinder with 18-Position Grind Selector, Cup Size Selector for 4 – 18 Cups, DBM-8P1, Black Stainless |
|
| 8 | SHARDOR Professional Conical Burr Coffee Grinder, Coffee Bean Grinder with 48 Grind Settings for Espresso, Drip & French Press, Upgraded Anti-Static Technology, Precision Timer, Stainless Steel |
|
| 9 | Amazon Basics Electric Coffee Grinder, Coffee Bean and Spice Grinder, With Heavy-Duty Stainless Steel Grind Blades |
|
| 10 | Wancle Electric Coffee Grinder, Spice Grinder, One Touch Coffee Mill for Beans, Spices and More, with Clean Brush Black |
|
The fuse holder usually looks like a small plastic cap or a recessed twist-lock mechanism. You might need a flathead screwdriver or simply your fingers to twist or pry it open.
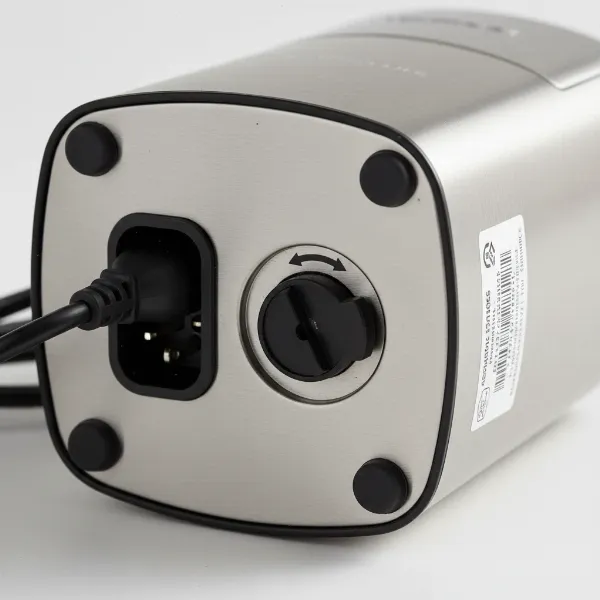 External fuse holder on electric coffee grinder near power cord inlet.
Internal Fuses (Thermal or Cartridge)
For other grinders, the fuse might be located inside the appliance. This is often the case for thermal fuses, which are typically wired directly into the motor circuit. If you don’t see an external fuse holder, you may need to:
- Consult your owner’s manual: This is always the best first step, as it will often indicate the fuse location or whether it’s a user-serviceable part.
- Carefully open the grinder’s casing: This usually involves unscrewing several screws on the bottom or sides of the unit. Be gentle and methodical, keeping track of all screws and casing parts. Once open, look for a small cylindrical component, often wrapped in an insulating sleeve, usually near the motor or power board.
“Many household appliances can be repaired with a part that costs under a dollar. A thermal fuse is an electrical safety component placed in lots of appliances. If the appliance overheats, the thermal fuse fails, shutting off electricity through the circuit making it so the device no longer works.” – Peter Mui, Fixit Clinic
Choosing the Right Replacement Fuse
This step is critical for safety and proper functioning. Using the wrong fuse can either fail to protect your grinder or, worse, cause further damage or create a fire hazard.
Matching Specifications
You must match the specifications of the old fuse precisely. Look for markings on the fuse itself, which typically include:
- Amperage (A): Indicates the maximum current the fuse can safely carry (e.g., 2A, 5A).
- Voltage (V): The maximum voltage the fuse can withstand (e.g., 250V).
- Type: Fast-blow or slow-blow (often indicated by an “F” for fast or “T” for slow/time-delay). Fast-blow fuses react quickly to surges, while slow-blow fuses tolerate brief, harmless current spikes, common in motors during startup.
- Temperature Rating (for thermal fuses): Measured in Celsius, this indicates the temperature at which the fuse will blow.
If the markings are difficult to read, check your grinder’s owner’s manual or the manufacturer’s website for fuse specifications. You can also take the old fuse to an electronics store for assistance in finding an exact match. Never use a fuse with a higher amperage rating than the original, as this bypasses the safety design and could lead to overheating or fire.
Step-by-Step: Replacing an External Fuse
If your electric grinder has an external cartridge fuse, the replacement process is generally straightforward:
- Unplug the Grinder: Double-check that the grinder is completely disconnected from the power source.
- Locate the Fuse Holder: Find the fuse cap or compartment, usually on the back or bottom of the unit.
- Open the Fuse Holder:
- For a twist-off cap: Use a flathead screwdriver or coin to turn the cap counter-clockwise until it loosens and can be removed.
- For a pull-out tray: Gently pry or pull the small tray that holds the fuse out from the casing.
- Remove the Old Fuse: Carefully pull or tip the old fuse out of its holder.
- Inspect the Old Fuse: A blown glass fuse will typically have a visibly broken or melted wire inside. For ceramic fuses, a multimeter is the best way to test for continuity. Set your multimeter to the continuity setting (or resistance/ohms) and touch the probes to both ends of the fuse. If it beeps or shows a reading close to zero, the fuse is good. If it shows “OL” or no reading, it’s blown.
- Insert the New Fuse: Place the replacement fuse into the holder, ensuring it sits snugly.
- Close the Fuse Holder:
- For a twist-off cap: Insert the cap and turn it clockwise until it’s finger-tight. Avoid overtightening.
- For a pull-out tray: Slide the tray back into its slot until it clicks securely into place.
- Test the Grinder: Plug your grinder back into the outlet and attempt to turn it on. If the fuse replacement was successful, your grinder should now operate normally.
What if it’s a Thermal Fuse or Internal Fuse?
Replacing an internal thermal fuse or another type of internally wired fuse is more complex and may require a higher level of technical skill, including soldering.
- Disassembly: You’ll need to carefully open the grinder’s casing. Document each step (photos are helpful) to ensure proper reassembly.
- Identification: Locate the thermal fuse, which is often a small, cylindrical component wrapped in a heat-resistant sleeve, wired in series with the motor.
- Replacement: Thermal fuses are usually soldered into the circuit. You’ll need a soldering iron, solder, and desoldering tools to remove the old one and install the new one. Ensure you use a replacement with the exact same temperature and current rating, and that the new fuse is properly insulated.
- Reassembly: Put the grinder back together, making sure all wires are securely connected and no parts are pinched.
If you are not comfortable with internal electrical work or soldering, it’s always best to seek professional assistance.
Troubleshooting: When the New Fuse Blows Immediately
If you replace the fuse, and the new one blows as soon as you turn on the grinder (or even when you plug it in), it’s a clear indication that the fuse wasn’t the root cause of the problem. Instead, there’s a deeper electrical issue within your grinder, such as:
- A short circuit: This could be due to damaged wiring or a faulty component.
- A seized or failing motor: An overburdened motor draws excessive current, causing the fuse to blow.
- Internal wiring fault: A loose or damaged connection causing an unintended path for electricity.
In such cases, continuously replacing fuses is not only futile but can also be dangerous. It means the safety mechanism is working precisely as intended, highlighting a serious malfunction.
When to Call a Professional
While replacing a fuse can be a DIY task, there are times when it’s best to call in a professional appliance repair technician:
- If you are uncomfortable with electrical work: Safety should always come first.
- If you cannot locate the fuse: Some models make it very difficult to access.
- If the new fuse blows immediately: This points to an underlying problem that requires expert diagnosis and repair.
- If your grinder is still under warranty: Attempting a DIY repair might void the warranty.
A professional can safely diagnose the issue, replace faulty components, and ensure your grinder operates correctly and safely.
Conclusion
A blown fuse in your electric coffee grinder can be an annoying hiccup, but often it’s a simple, inexpensive fix that saves your grinder from the landfill. By understanding the role of the fuse, practicing strict safety protocols, and carefully following the replacement steps, you can often restore your grinder to full working order. Remember to always use the correct fuse specifications and to seek professional help if the problem persists or if you’re ever unsure. With a little care and attention, your grinder will be back to delivering delicious, freshly ground coffee for many mornings to come.
What’s your go-to method for ensuring your coffee grinder stays in top shape for years?
Frequently Asked Questions
What does a blown fuse look like in an electric grinder?
A blown glass cartridge fuse will typically show a visibly broken, charred, or melted wire filament inside the glass tube. For ceramic or non-transparent fuses, you usually can’t see the internal damage, so you’d need a multimeter to test for continuity to confirm it’s blown.
Can I use a fuse with a higher amperage than the original?
No, absolutely not. Using a fuse with a higher amperage rating than specified for your electric grinder is extremely dangerous. It overrides the intended safety mechanism, allowing excessive current to flow, which can cause severe damage to the grinder’s motor, internal components, or even lead to an electrical fire. Always match the fuse’s exact specifications.
How often should I expect to replace my grinder’s fuse?
Under normal operating conditions, a fuse in an electric grinder should rarely blow. If you find yourself replacing fuses frequently, it indicates an underlying problem with your grinder, such as a motor fault, consistent overloading, or an internal short circuit, and requires professional inspection.
Where can I buy a replacement fuse for my electric grinder?
Replacement fuses can typically be purchased at electronics stores, hardware stores, or online retailers. It is essential to bring the old fuse with you or have its exact specifications (amperage, voltage, and type) to ensure you buy the correct replacement.