After the satisfying ritual of deep cleaning your coffee grinder, ensuring every crevice is free of stubborn coffee oils and lingering grinds, you might find your precious brewing device feels… a little off. This isn’t just a figment of your imagination. Cleaning, especially involving disassembly, can subtly shift the critical “zero point” of your grinder. Re-establishing this benchmark is vital for consistent, delicious coffee, allowing you to once again dial in that perfect grind with precision.
Understanding the “Zero Point” and Why It Matters
The “zero point” on your coffee grinder refers to the precise setting where the grinding burrs just barely touch each other without creating excessive friction or damage. It’s the absolute finest possible grind your machine can achieve before the burrs begin to grind against themselves. While you’ll rarely brew coffee at this setting, it serves as an indispensable reference point for all your grind adjustments.
Why is this so important, especially after cleaning? Coffee residues and oils accumulate over time, filling microscopic gaps and subtly altering the burr spacing. When you thoroughly clean these away, the physical relationship between the burrs can change. A misaligned or incorrectly set zero point means your “setting 5” might now grind much finer or coarser than it did before, leading to inconsistent extraction, unpredictable flavors, and a frustrating brewing experience. For espresso, where grind size precision is paramount, even minor deviations can significantly impact taste.
Essential Preparation Before Zeroing
Before you begin the zeroing process, a few preparatory steps will ensure accuracy and safety:
Safety First: Disconnect Power
|
Our Picks for the Best Coffee grinder in 2026
As an Amazon Associate I earn from qualifying purchases.
|
||
| Num | Product | Action |
|---|---|---|
| 1 | Hamilton Beach Fresh Grind Electric Coffee Grinder for Beans, Spices and More, Stainless Steel Blades, Removable Chamber, Makes up to 12 Cups, Black |

|
| 2 | Hamilton Beach Custom Grind Electric Coffee Grinder for 4-14 Cups, One-Press Hand-Free Operation with Auto Shutoff, Removable Grinding Bowl For Easy Pour and Clean, Stainless Steel (80406) |
|
| 3 | Amazon Basics Electric Coffee Grinder, Coffee Bean and Spice Grinder, With Heavy-Duty Stainless Steel Grind Blades |
|
| 4 | SHARDOR Professional Conical Burr Coffee Grinder, Coffee Bean Grinder with 48 Grind Settings for Espresso, Drip & French Press, Upgraded Anti-Static Technology, Precision Timer, Stainless Steel |
|
| 5 | Cuisinart Coffee Grinder, Electric One-Touch Automatic Burr Coffee Grinder with 18-Position Grind Selector, Cup Size Selector for 4 – 18 Cups, DBM-8P1, Black Stainless |
|
| 6 | Automatic Coffee Machine, 20-Bar Pressure Espresso Maker with Built-in Grinder, 15-Precision Settings, One-Touch Latte & Cappuccino System, Smart Self-Cleaning |
|
| 7 | BLACK+DECKER One Touch Coffee Grinder, 2/3 Cup Coffee Bean Capacity, Spice Grinder, One Touch Push-Button Control -150 Watts -Stainless Steel Blades |
|
| 8 | OXO Brew Conical Burr Coffee Grinder - Silver, Stainless Steel Burrs, One-Touch Automatic Smart Grind |
|
| 9 | Cuisinart Coffee Grinder, One Touch Control Coffee Bean Grinder with Stainless Steel Bowl and Blades, 2.5 oz/70g Capacity Enough for 12 Cups, On/Off Switch with Safety Interlock, DCG-20BKN, Black |
|
| 10 | Wancle Electric Coffee Grinder, Spice Grinder, One Touch Coffee Mill for Beans, Spices and More, with Clean Brush Black |
|
This is non-negotiable for electric grinders. Always completely disconnect your grinder from the power source before performing any adjustments or cleaning, as burrs are sharp and precision-engineered.
Thorough Cleaning is Key
Zeroing requires clean burrs to accurately determine the point of contact. If your grinder isn’t already spotless from your recent cleaning, take a moment to ensure all coffee particles, oils, and residues are removed from the grinding chamber and burr teeth. Use a small brush and a dry cloth. For electric grinders, special cleaning powders can be used without disassembly.
Identify Your Grinder’s Adjustment Mechanism
Coffee grinders, both electric and manual, come with various adjustment systems:
- External Ring Adjustments: Common on many manual grinders (e.g., Comandante-style) and some electric models.
- Top Dial Adjustments: Found on manual grinders like Timemore C2/C3 and some electric home grinders.
- Internal Adjustment Rings: Often seen in premium manual grinders, sometimes requiring partial disassembly to access.
- Stepped vs. Stepless: Stepped grinders have distinct “clicks” for each increment, while stepless allow for infinite micro-adjustments. Knowing your type helps in marking and repeating settings.
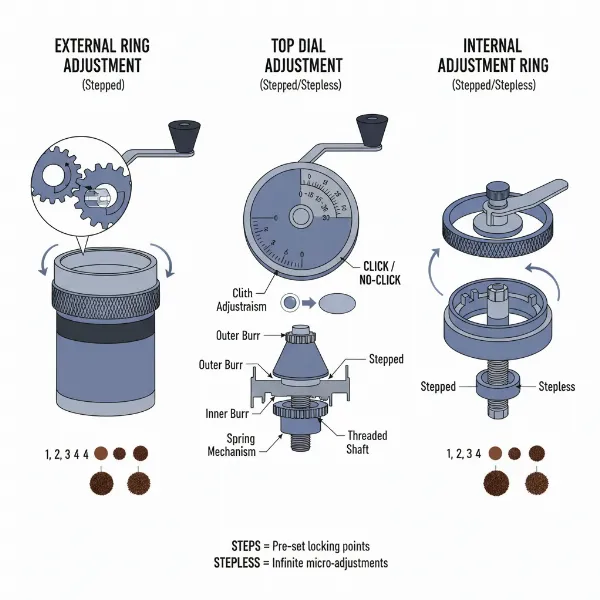 Illustration of various coffee grinder adjustment mechanisms: external ring, top dial, and internal.
“A precisely adjusted grinder is the foundation for perfect coffee enjoyment. Especially with external grinders – those not built into the coffee machine – it is important to correctly define the so-called zero point.” – Espressa.ch Guide, Coffee Equipment Experts
Step-by-Step Guide to Zeroing Your Electric Burr Grinder
This universal guide applies to most flat or conical burr electric grinders:
- Ensure Cleanliness and Safety: Confirm your grinder is unplugged and the burrs are thoroughly cleaned.
- Close the Burrs (Finest Setting): Slowly turn the grind setting knob or collar towards the “fine” direction. Continue turning until the burrs can no longer move freely and you feel resistance. You might hear a very subtle “chirping” or light scratching sound as they just begin to touch. Do not force them together tightly.
- Identify the True Zero Point: Once the burrs are just touching, slowly back off the adjustment slightly. Listen carefully for the precise moment when the grinding or friction noise just disappears. This is your true zero point – the finest setting before the burrs make damaging contact.
- Mark or Set the Zero Point:
- If your grinder has an adjustable scale, align the “0” marking with this newly found point.
- If no scale is available, use a small marker or a piece of tape to create your own “0” reference point.
- Test and Adjust: Grind a small test portion of coffee at your desired setting (e.g., for espresso or filter). Adjust slightly finer or coarser if necessary until you achieve the ideal grind size for your brewing method.
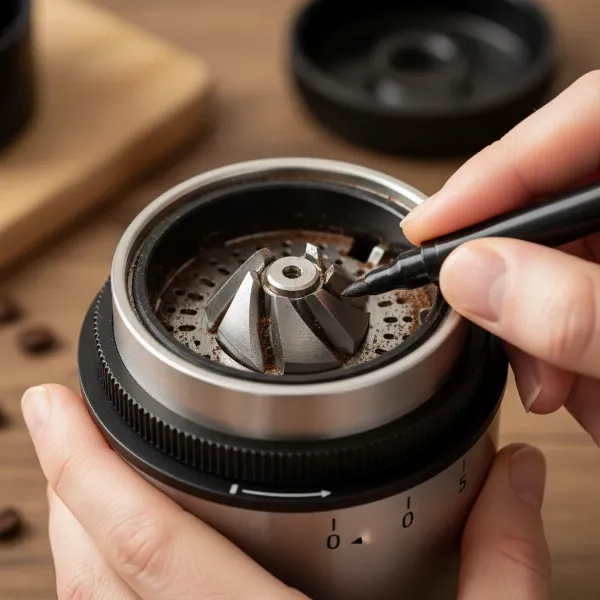 A person calibrating an electric burr coffee grinder, adjusting the setting to find the zero point.
Zeroing Your Manual Coffee Grinder
The process for manual grinders is similar, focusing on feel and sound:
- Clean and Empty: Ensure your hand grinder is clean, empty of beans, and dry.
- Start from Coarse: Turn the adjustment mechanism to its coarsest setting. This prevents accidental damage from forcing burrs together too quickly.
- Gradually Move Finer: Slowly turn the adjustment dial or ring towards the finer direction, moving in small increments (half-turns or a few clicks at a time). While adjusting, gently rotate the handle to feel for resistance.
- Identify Burr Touch Point: Listen carefully for a light “chirping” or paper-like scratching sound. This subtle noise indicates the burrs are just beginning to make contact. The handle will also start to show increased resistance. Be attentive, as the difference can be subtle.
- Verify with Handle Movement: When you believe you’ve found zero, try slowly turning the handle. It should move with slight resistance but without feeling forced or stuck. If the handle won’t move, you’ve gone too far—back off slightly.
- Mark Your True Zero: Note or mark this position on your grinder. For stepped grinders, count the number of clicks from this zero point.
- Double-Check (Back-off Test): From your potential zero point, back off slightly coarser (1-2 clicks or a small turn). The handle should now turn more freely. Go back to your marked zero point to confirm the resistance returns.
Different Grinder Types: Specific Considerations
While the core principles remain, some grinders have unique zeroing characteristics:
- External Ring Adjustment Grinders (e.g., Comandante-style): Hold the grinder body firmly while turning the adjustment ring. The zero point is often 4-5 clicks before the burrs completely lock. These typically have pronounced clicks, making counting easier.
- Top Dial Adjustment Grinders (e.g., Timemore C2/C3): Zero is often found by turning the dial clockwise until slight resistance. The dial usually has numbered markings to help note your zero position.
- Niche Zero/Single Dose Grinders: For specific models like the Niche Zero, the process might involve tightening the dosing funnel all the way down, then aligning a specific mark (e.g., a silver dot) on the black ring with a “calibrate” arrow. Once aligned, backing off will calibrate the grinder.
Maintaining Your Grinder’s Calibration
Your grinder’s zero point isn’t set permanently; it requires periodic checks and adjustments to maintain accuracy.
When to Re-Zero Your Grinder:
- After Thorough Cleaning and Disassembly: As discussed, this is the primary reason.
- If Grind Consistency Declines: Notice unexpected fines or boulders, or your usual settings yield different results.
- When Changing Significantly Different Coffee Types: Moving between very light and very dark roasts can warrant re-zeroing.
- After Travel or Shipping: Vibrations can affect burr alignment.
- With Seasonal Changes: Humidity and temperature can subtly affect grinder components.
- Approximately Every 3-6 Months: A good general maintenance interval for regular users.
“Many coffee lovers don’t realize that the factory settings on their grinders may not represent the ‘true zero’ point. This discrepancy can lead to inconsistent grinding results and make it difficult to replicate your favorite coffee’s taste day after day.” – Savor Suite, Coffee Grinding Specialists
Conclusion
Mastering the art of zeroing your coffee grinder after cleaning is a fundamental skill for any coffee enthusiast. By understanding the “true zero” point and consistently calibrating your machine, you unlock a world of precision that directly translates to enhanced flavor clarity, balanced sweetness, reduced bitterness, and improved mouthfeel in every cup. This seemingly small adjustment empowers you to confidently navigate different brewing methods, ensuring that your grinder performs optimally and consistently.
So, the next time you finish a deep clean, take a few extra minutes to re-zero. What subtle flavors might you discover in your favorite coffee once your grinder is perfectly dialed in?
Frequently Asked Questions
What does “zeroing” a coffee grinder mean?
Zeroing a coffee grinder means finding the exact point where the burrs just touch each other without grinding against themselves. This serves as a fundamental reference point for accurately setting all your desired grind sizes, ensuring precision and consistency in your brewing.
Why is it important to zero my grinder after cleaning?
Cleaning, especially deep cleaning or disassembly, can alter the physical relationship between your grinder’s burrs. Zeroing recalibrates this relationship, ensuring that your grind settings remain accurate and consistent, which is crucial for achieving predictable and delicious coffee extraction.
Can I zero my hand grinder without disassembling it?
Yes, most hand grinders can be zeroed without full disassembly. You can typically achieve this by thoroughly cleaning the grinder, starting from a coarse setting, and slowly adjusting finer while gently turning the handle until you hear or feel the burrs just make contact.
What should I listen for when finding the zero point?
When zeroing your grinder, listen for a very subtle “chirping” or light “scratching” sound, similar to rubbing fine sandpaper or tissue paper together. This indicates the burrs are just beginning to touch. A harsh, grinding, or metal-on-metal sound usually means you’ve gone too far.
How often should I re-zero my coffee grinder?
It’s recommended to re-zero your grinder after any thorough cleaning or disassembly, if you notice a decline in grind consistency, after significant travel, or roughly every 3-6 months with regular use. For espresso enthusiasts, more frequent checks (e.g., monthly) might be beneficial due to the high precision required.