There are few things more frustrating for a coffee enthusiast than a trusty grinder suddenly refusing to work, jammed solid with coffee grounds. The consistent whir turns into a strained hum, and instead of perfectly uniform grounds, you’re left with a stubborn blockage. If you’ve ever wondered, “Why is my coffee grinder clogging up?”, you’re not alone. This common issue can disrupt your morning routine and impact the quality of your brew. Understanding the root causes behind a clogged coffee grinder is the first step to a smooth-running machine and consistently delicious coffee. In this comprehensive guide, we’ll delve into the most frequent culprits behind grinder clogs and provide actionable solutions and preventative measures to keep your grinder performing at its best.
Understanding Coffee Grinder Clogging
While blade grinders simply chop beans, often resulting in an uneven grind and fine dust, burr grinders are designed to consistently crush beans between two abrasive surfaces (burrs) to a uniform size. Both types can experience issues, but clogging is primarily a concern for burr grinders, where fine particles, coffee oils, and other factors can create a sticky buildup that impedes the grinding mechanism or the exit chute.
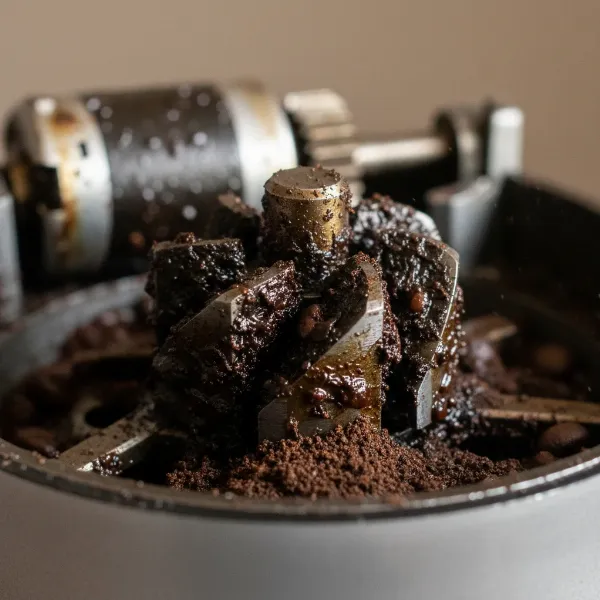 Close-up of coffee grinder burrs clogged with dark, sticky coffee residue and fine grounds
Common Causes of Coffee Grinder Clogging
A coffee grinder clog doesn’t usually happen out of the blue. It’s often the result of one or a combination of factors accumulating over time. Identifying these causes is key to effective troubleshooting.
Oily Coffee Beans & Residue Buildup
|
Our Picks for the Best Coffee grinder in 2026
As an Amazon Associate I earn from qualifying purchases.
|
||
| Num | Product | Action |
|---|---|---|
| 1 | BLACK+DECKER One Touch Coffee Grinder, 2/3 Cup Coffee Bean Capacity, Spice Grinder, One Touch Push-Button Control -150 Watts -Stainless Steel Blades |

|
| 2 | Cuisinart Coffee Grinder, One Touch Control Coffee Bean Grinder with Stainless Steel Bowl and Blades, 2.5 oz/70g Capacity Enough for 12 Cups, On/Off Switch with Safety Interlock, DCG-20BKN, Black |
|
| 3 | Cuisinart Coffee Grinder, Electric One-Touch Automatic Burr Coffee Grinder with 18-Position Grind Selector, Cup Size Selector for 4 – 18 Cups, DBM-8P1, Black Stainless |
|
| 4 | OXO Brew Conical Burr Coffee Grinder - Silver, Stainless Steel Burrs, One-Touch Automatic Smart Grind |
|
| 5 | Automatic Coffee Machine, 20-Bar Pressure Espresso Maker with Built-in Grinder, 15-Precision Settings, One-Touch Latte & Cappuccino System, Smart Self-Cleaning |
|
| 6 | Hamilton Beach Custom Grind Electric Coffee Grinder for 4-14 Cups, One-Press Hand-Free Operation with Auto Shutoff, Removable Grinding Bowl For Easy Pour and Clean, Stainless Steel (80406) |
|
| 7 | SHARDOR Professional Conical Burr Coffee Grinder, Coffee Bean Grinder with 48 Grind Settings for Espresso, Drip & French Press, Upgraded Anti-Static Technology, Precision Timer, Stainless Steel |
|
| 8 | Amazon Basics Electric Coffee Grinder, Coffee Bean and Spice Grinder, With Heavy-Duty Stainless Steel Grind Blades |
|
| 9 | Wancle Electric Coffee Grinder, Spice Grinder, One Touch Coffee Mill for Beans, Spices and More, with Clean Brush Black |
|
| 10 | Hamilton Beach Fresh Grind Electric Coffee Grinder for Beans, Spices and More, Stainless Steel Blades, Removable Chamber, Makes up to 12 Cups, Black |
|
Darker roasted coffee beans naturally release more oils. These oils, along with fine coffee particles, can gradually coat the burrs, grinding chamber, and exit chute. Over time, this sticky residue hardens, forming a paste-like substance that significantly restricts the flow of grounds and can even seize the burrs, leading to a complete blockage. Older or stale coffee beans can also contribute to this issue, as their oils become more prominent and less desirable.
Grind Size Setting Too Fine
When you set your grinder to produce an extremely fine grind, particularly for espresso, the particles become incredibly small and dense. This increased surface area and reduced particle size can make it difficult for the grinder to expel the grounds efficiently. The fine grounds can clump together, especially if there’s any moisture, forming a compact mass that chokes the burr chamber or the grinder’s output chute.
Static Electricity
Static electricity is a common nuisance in coffee grinding. As coffee beans are ground, the friction can generate an electrostatic charge. This charge causes the ground coffee particles to stick to the grinder’s internal components, such as the burrs, walls of the chamber, or the chute. This buildup of static-charged grounds reduces flow and can quickly lead to blockages, making a mess and hindering performance.
High Humidity & Temperature
Environmental conditions play a significant role in grinder performance. High humidity and elevated temperatures can make coffee grounds more prone to sticking together. Moisture in the air can cause the grounds to become tacky, increasing the likelihood of clumping and adhering to the grinder’s internal surfaces. This is why a grinder might clog more frequently in certain climates or seasons.
Lack of Regular Cleaning
This is perhaps the most overlooked cause of grinder clogging. Without consistent maintenance, coffee oils and fine residue will inevitably build up. This accumulation doesn’t just reduce efficiency; it creates a breeding ground for blockages and can also impart stale, rancid flavors to your fresh coffee. Regular cleaning is paramount to preventing these issues.
Overloading the Hopper
While tempting to fill the hopper to the brim, especially in busy households or cafes, overloading can strain your grinder. Feeding too many beans at once can overwhelm the motor and the burrs, making it harder to process the coffee efficiently. This can lead to grounds getting jammed and the grinder struggling to operate, potentially causing a clog.
Worn or Dull Burrs
The burrs are the heart of your grinder. Over time and with extensive use, burrs can become dull. Worn burrs are less effective at cleanly cutting and crushing coffee beans, instead tearing them unevenly. This results in more “fines” (very tiny particles) and inconsistent grind sizes, both of which are more prone to clumping and getting stuck within the grinder’s mechanism. Additionally, some grinders have “expeller paddles” that help push grounds out, and wear on these can also reduce expulsion efficiency.
Full Grounds Bin or Blocked Chute
Sometimes, the problem isn’t inside the grinding chamber but in the pathway out. If your grounds collection bin is overly full, or if coffee grounds have backed up in the exit chute, the grinder has nowhere to expel the freshly ground coffee. This physical obstruction will quickly cause a backlog and a subsequent clog within the grinding mechanism.
Foreign Objects
While less common, sometimes a small stone, an unroasted bean, or other debris can accidentally make its way into your coffee beans. These hard foreign objects can jam the burrs, prevent them from rotating, and quickly lead to a severe clog or even damage your grinder.
Preventing and Fixing a Clogged Coffee Grinder
Addressing a clogged grinder requires a combination of immediate solutions and long-term preventative habits. Here’s how to keep your grinder running smoothly.
Implement a Regular Cleaning Regimen
Consistent cleaning is the single most effective way to prevent clogging.
- Daily Brushing: After each use, take a small stiff-bristled brush (often provided with grinders) or a pipe cleaner to brush out the grinder’s chute and visible grinding chamber areas. This removes loose grounds and prevents daily buildup.
- Weekly/Bi-weekly Deep Clean: For more thorough cleaning, disassemble your grinder (refer to your manufacturer’s instructions). Remove the burrs and use a brush, vacuum, or dry cloth to clear away compacted coffee grounds and oils from the burrs, grinding chamber, and hopper. The hopper can be washed with warm, soapy water, ensuring it’s completely dry before reassembly.
- Monthly/Quarterly Specialized Cleaning: Use dedicated coffee grinder cleaning tablets (e.g., Urnex Grindz). These food-safe tablets are designed to absorb coffee oils and dislodge stale particles. Grind them like regular beans, then run a small amount of coffee beans through to clear any residue. Avoid using rice for cleaning, as its hardness can potentially damage some burr sets.
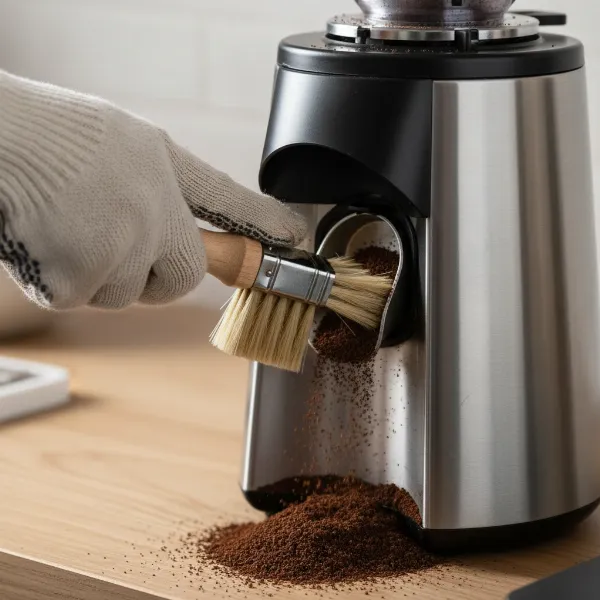 Hand using a small brush to clean residual coffee grounds from a grinder's chute
Optimize Grind Settings
If you frequently experience clogging when grinding for espresso, consider adjusting your grind size slightly coarser. Even a minor adjustment can make a significant difference in how the grounds flow through the grinder, reducing clumping and blockages. Experiment to find the finest grind that works without causing issues for your specific brewing method.
Manage Your Beans
The type and quality of your coffee beans greatly impact grinder performance.
- Choose Wisely: If possible, opt for freshly roasted beans that are less oily. While dark roasts offer unique flavors, their higher oil content is a primary contributor to grinder gunk.
- Proper Storage: Store your coffee beans in an airtight container, away from direct sunlight, heat, and moisture. This minimizes oil oxidation and prevents beans from absorbing ambient humidity, which can make them stickier when ground.
- Grind What You Need: Only grind the amount of coffee you plan to brew immediately. Grinding large batches in advance or leaving beans in the hopper for extended periods can increase oil residue and exposure to humidity.
Combat Static Electricity
Static can be a persistent problem, but there are ways to mitigate it:
- The Ross Droplet Technique (RDT): Before grinding, add a single drop of water to your whole coffee beans and give them a quick shake. This introduces a tiny amount of moisture that helps dissipate static electricity, leading to a cleaner grind and less mess.
- Control Ambient Humidity: If you live in a particularly dry climate, using a humidifier in your coffee preparation area might help reduce static.
Avoid Overloading
Resist the urge to fill your grinder’s hopper to maximum capacity. Grinding in smaller batches allows the grinder to operate more efficiently and prevents the burrs from getting overwhelmed or jammed by an excessive amount of beans. Ensure your grounds bin is also regularly emptied so there’s always space for the fresh grounds.
Inspect and Replace Worn Parts
Periodically inspect your grinder’s burrs. Look for signs of wear, such as dull edges or significant abrasion. If your burrs are worn, they won’t grind effectively, contributing to clogging and poor coffee quality. Many grinders allow for burr replacement, which can significantly extend the life and performance of your machine. Also, check any expeller paddles or sweepers for wear.
Ensure Clear Pathways
Always make sure the path from the grinding chamber to the grounds bin is clear. If you have a dosing mechanism, ensure it’s free of obstructions. An overly full grounds bin can create back pressure, forcing grounds to remain in the chute and causing a clog.
“A well-maintained coffee grinder is as crucial as quality beans for a superior brew. Regular cleaning and attention to detail can prevent most clogging issues, transforming your daily coffee ritual.” – CoffeeGrinderChoice.com Admin, Coffee Grinder Expert
Conclusion
A clogged coffee grinder is more than an inconvenience; it’s a signal that your machine needs attention. By understanding the common culprits—from oily beans and fine grind settings to static and neglected cleaning—you can proactively prevent these frustrating blockages. Implementing a routine of regular cleaning, optimizing your grind settings, and being mindful of your coffee bean storage and grinding habits are simple yet powerful steps to ensure your grinder operates flawlessly. Don’t let a clog stand between you and your perfect cup. Embrace these troubleshooting tips, and you’ll enjoy a consistently smooth grinding experience and the rich, untainted flavors of your favorite coffee.
What are your top tips for keeping your Coffee Grinder clog-free?
Frequently Asked Questions
How often should I clean my coffee grinder to prevent clogs?
For daily users, a quick brush of the chute is recommended after each use, a thorough burr cleaning weekly or bi-weekly, and a deep clean with specialized tablets every month or two. If you use oily beans, increase the frequency of deep cleaning.
Can oily coffee beans really clog my grinder?
Yes, absolutely. Oily coffee beans, especially dark roasts or older beans, release more oils that can stick to your grinder’s internal components. This oil, combined with fine coffee particles, forms a sticky residue that hardens over time, severely impeding the grinding mechanism and leading to clogs.
What is the Ross Droplet Technique (RDT) and how does it help with static?
The Ross Droplet Technique (RDT) involves adding one or two drops of water to your whole coffee beans just before grinding. A quick shake then distributes the moisture. This small amount of water helps to neutralize static electricity generated during grinding, preventing grounds from clumping and sticking to the grinder.
Should I use rice to clean my coffee grinder?
While some sources suggest using rice, it’s generally advised against. Rice is harder than coffee beans and can potentially dull or damage your grinder’s burrs, particularly in lower-end models. Specialized grinder cleaning tablets are a safer and more effective alternative for deep cleaning.
How do I know if my grinder’s burrs are worn out?
Signs of worn burrs include inconsistent grind sizes, a noticeable increase in “fines” (dust-like particles), a longer grinding time, or a change in the sound of your grinder. If you consistently experience clogging despite regular cleaning, inspecting your burrs for dullness or damage is a crucial step.